0 Comments

We have a project which is using the older DocumentClient based CosmosDB SDK. Getting this project to communicate with a Docker hosted CosmosDB emulator turned out to be a hassle.

The new SDK contains the following functionality for ignoring certificate issues:

CosmosClientOptions cosmosClientOptions = new CosmosClientOptions()
{
    HttpClientFactory = () =>
    {
        HttpMessageHandler httpMessageHandler = new HttpClientHandler()
        {
            ServerCertificateCustomValidationCallback = HttpClientHandler.DangerousAcceptAnyServerCertificateValidator
        };

        return new HttpClient(httpMessageHandler);
    },
    ConnectionMode = ConnectionMode.Gateway
};

CosmosClient client = new CosmosClient(endpoint, authKey, cosmosClientOptions);

But the DocumentClient works little differently. But the good thing is that we can pass in a HttpClientHandler when creating the DocumentClient. So to ignore the cert issues when developing locally, one can use:

                    var handler = new HttpClientHandler();
                    handler.ClientCertificateOptions = ClientCertificateOption.Manual;
                    handler.ServerCertificateCustomValidationCallback = 
                        (httpRequestMessage, cert, cetChain, policyErrors) =>
                        {
                            return true;
                        };

                    client = new DocumentClient(
                        new Uri(endPointUrl),
                        primaryKey,
                        handler, connectionPolicy
                    );

If you need to configure serializer settings and the http client handler, things are a bit harder as there is not suitable public constructor in DocumentClient for configuring both. Reflection to rescue:

                    var handler = new HttpClientHandler();
                    handler.ClientCertificateOptions = ClientCertificateOption.Manual;
                    handler.ServerCertificateCustomValidationCallback = 
                        (httpRequestMessage, cert, cetChain, policyErrors) =>
                        {
                            return true;
                        };

                    client = new DocumentClient(
                        new Uri(endPointUrl),
                        primaryKey,
                        handler, connectionPolicy
                    );
                    
                    var prop = client.GetType().GetField("serializerSettings", System.Reflection.BindingFlags.NonPublic
                                                               | System.Reflection.BindingFlags.Instance);
                    prop.SetValue(client, serializerSettings);
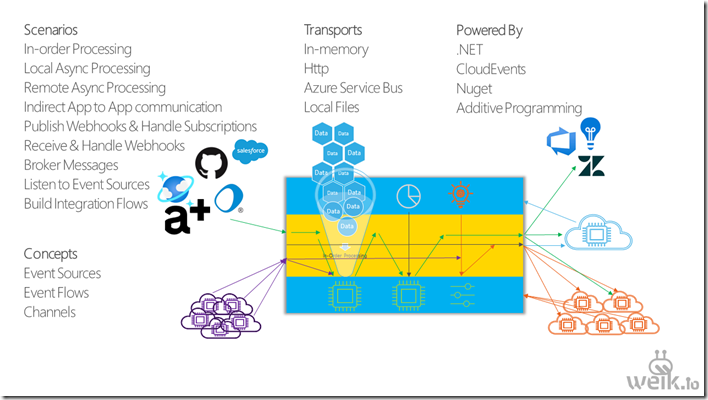
logo_2Event Framework is an Open Source CloudEvents Framework for .NET applications. You include it in your .NET Core 3.1/.NET 6 app and it helps you to create, receive, send and to handle CloudEvents. After reaching 1.0.0-alpha.0.100 (with the first alpha dating back to early 2020), Event Framework is now available in beta form, with the 1.0.0-beta.1.1 release.

How to get started

The easiest way to get started with Event Framework is to include the package Weikio.EventFramework.AspNetCore in your ASP.NET Core based application and then to register the required bits and pieces into service container:

services.AddEventFramework()

Main features

The main features of the Event Framework include:

1. Create CloudEvents using CloudEventCreator
2. Send & Receive CloudEvents using Channels and Event Sources
3. Build Event Flows

Weikio Scenarios

Here’s a short example of each of those:

Creating CloudEvents

Event Framework includes CloudEventCreator which can be used to transform .NET objects into CloudEvents. It can be customized and used through either a static CloudEventCreator.Create-method or using a CloudEventCreator instance.

var obj = new CustomerCreated(Guid.NewGuid(), "Test", "Customer");

// Object to event
var cloudEvent = CloudEventCreator.Create(obj);

// Object to event customization
var cloudEventCustomName = CloudEventCreator.Create(obj, eventTypeName: "custom-name");

For more examples, please see the following tests in the Github repo: https://github.com/weikio/EventFramework/tree/master/tests/unit/Weikio.EventFramework.UnitTests

Sending CloudEvents

Event Framework uses Channels when transporting and transforming events from a source to an endpoint. Channels have adapters, components and endpoints (+ interceptors) which are used to process an event. Channels can be build using a fluent builder or more manually.

https://mermaid.ink/img/pako:eNp1UctOwzAQ_JXI57YSHHNAKhAEUgWI5ujLJt40RvE68gMEVf-dTd2UkghbsmbH45ldeS9qq1DkounsZ92CC9nmTdLquShXL9U71mG5vLlrgQg7SSfA1GNZvl7W6-_ocIvuQ9d4G70kH6udg77Nzo8zXko7ttSWjikDs1bQB3R-iLGmt4QUfLo6W4ya_zxSowk_FRQNOqg6TASSmthNc-aGG7vjfh50x6mJSZjJ0gH5xjozcf81ZVFBqrd6PsiEnwePgqu_5fVF2PEYtlgIHtSAVvx9-0EhRWjRoBQ5Q4UNxC5IIenA0tgrCFgoHawTeQOdx4WAGOz2i2qRBxdxFN1r4HbNSXX4AdpIuLI

Here's an example where a channel is created using the fluent builder with a single HTTP endpoint. Every object sent to this channel is transformed to CloudEvent and then delivered using HTTP:

var channel = await CloudEventsChannelBuilder.From("myHttpChannel")
    .Http("https://webhook.site/3bdf5c39-065b-48f8-8356-511b284de874")
    .Build(serviceProvider);

await channel.Send(new CustomerCreatedEvent() { Age = 50, Name = "Test User" });

In many situations in your applications you don’t send messages directly into the channel. Instead you inject ICloudEventPublisher into your controller/service and use it to publish events to a particular channel or to the default channel:

public IntegrationEndpointService(ICloudEventPublisher eventPublisher)
{
    _eventPublisher = eventPublisher;
}

...

await _eventPublisher.Publish(new EndpointCreated()
{
    Name = endpoint.Name,
    Route = endpoint.Route,
    ApiName = endpoint.ApiName,
    ApiVersion = endpoint.ApiVersion,
    EndpointId = result.Id.GetValueOrDefault(),
});

Receiving CloudEvents

Event Framework supports Event Sources. An event source can be used to receive events (for example: HTTP, Azure Service Bus) but an event source can also poll and watch changes happening in some other system (like local file system).

es_gif

Here's an example where HTTP and Azure Service Bus are used to receive events in ASP.NET Core and then logged:

services.AddEventFramework()
    .AddChannel(CloudEventsChannelBuilder.From("logChannel")
        .Logger())
    .AddHttpCloudEventSource("events")
    .AddAzureServiceBusCloudEventSource(
        "Endpoint=sb://sb.servicebus.windows.net/;SharedAccessKeyName=RootManageSharedAccessKey;SharedAccessKey=YDcvmuL4=",
        "myqueue");

services.Configure<DefaultChannelOptions>(options => options.DefaultChannelName = "logChannel");

Building Event Flows

Event Sources and Channels can be combined into Event Flows. Event Flows also support branching and subflows.

Here's an example where an event source is used to track file changes in a local file system and then all the created files are reported using HTTP:

var flow = EventFlowBuilder.From<FileSystemEventSource>(options =>
    {
        options.Configuration = new FileSystemEventSourceConfiguration() { Folder = @"c:\\temp\\myfiles", Filter = "*.bin" };
    })
    .Filter(ev => ev.Type == "FileCreatedEvent" ? Filter.Continue : Filter.Skip)
    .Http("https://webhook.site/3bdf5c39-065b-48f8-8356-511b284de874");

services.AddEventFramework()
    .AddEventFlow(flow);

Coming Next

Current document is lacking and samples also need work. The hope is to be able to include as many components and event sources as possible and for these, we’re looking at maybe using Apache Camel to bootstrap things.

Project Home

Please visit the project home site at https://weik.io/eventframework for more details. Though for now, the details are quite thin.

Source code

Source code for Event Framework is available from https://github.com/weikio/EventFramework.

0 Comments

If you’re using ASP.NET Core 3.1.1 and are seeing HTTP Error 500 when deploying your application into Azure App Service, there’s a high change that the issue is caused by a known issue:

If your project has a package reference that transtively references certain assemblies in the Microsoft.AspNetCore.App shared framework
that are also available as NuGet packages and executes on a runtime other than 64-bit Windows, you will receive a runtime exception at the time the assembly is loaded with a message like:

Could not load file or assembly 'Microsoft.AspNetCore.DataProtection.Abstractions, Version=3.1.1.0, Culture=neutral, PublicKeyToken=adb9793829ddae60'. The located assembly's manifest definition does not match the assembly reference. (0x80131040)


Solution is to switch to 64 bit Azure App Service or to manually reference the problematic package.

Debugging this can be a pain as Azure App Service’s diagnostic tools think that everything is running smoothly and IIS’ stdout only reports that application has successfully started. What can help is wrapping the CreateWebHostBuilder inside a try-catch. Here’s an example which uses nLog:

        public static void Main(string[] args)
        {
            var environment = Environment.GetEnvironmentVariable("ASPNETCORE_ENVIRONMENT");
            var isDev = string.Equals(environment, "development", StringComparison.InvariantCultureIgnoreCase);
            var configFileName = isDev ? "nlog.Development.config" : "nlog.config";

            var logger = NLogBuilder.ConfigureNLog(configFileName).GetCurrentClassLogger();

            logger.Info("Starting application. {Environment}, {LoggingConfigurationFileName}", environment, configFileName);

            try
            {
                CreateWebHostBuilder(args).Build().Run();
            }
            catch (Exception e)
            {
                logger.Error(e, "Failed to start application", e);
            }
            finally
            {
                NLog.LogManager.Shutdown();
            }
        }

0 Comments

Azure ARM templates allow you to automate your environment setups. But with a cost. Dealing with the long JSON-files is hard, even though there are visualizers like ARMVIZ available.

What can we do? In this series I’ll explore the options for automating your Azure environment setup.

Background

If you can create a completely new and fresh Azure environment for your system with a click of button, with everything deployed automatically, you’re in the happy land. If you can’t and setting up the environment requires some manual work, you should aim to automate the process completely. If you run the automated process twice, we want to end up with two identical systems but with the following differences: Each installation should have their own passwords and own urls.

ARM in Azure’s context stands for Azure Resource Manager. The key scenarios for ARM, as defined in the documentation, are:

  • Deploy resources together and easily repeat deployment tasks
  • Categorise resources to clarify billing and management
  • Enable enterprise-grade access control

We’re mainly interested in the first key scenario: How to automate your deployment.

When we use ARM, we’re using JSON based ARM-templates. We deploy the JSON-file, which Azure Resource Manager then converts to REST calls and the REST calls create the required resources. The key thing is that we only have to care about our JSON-template, ARM takes care of the rest.

Problem

ARM templates are great because they allow you to automate the environment setup. But they come with a cost: ARM templates tend to grow to these huge, almost monstorous JSON-files which are hard to understand and to maintain. And as we know, maintanability is the key when we want our systems to have a long life.

GitHub has a great source for templates. You can create simple and complex environments with these templates, ranging from something simple as Windows VM to MongoDB high availability installation. But if you look at these templates you can easily see the problem: the simple Windows VM is 179 lines of JSON. MongoDB is 500 lines.

Personally I think that the problem with ARM templates is obvious: The templates try to use JSON in a situation where it isn’t build for. In theory you can use JSON to describe your environment. But to actually make things work you need some concepts from programming languages:

  • Variables
  • Conditions
  • Loops

XML and JSON are both great ways to describe static data but they fall short when you try to “programming languagefy” them. ARM templates aren’t the only one with the same problem: If you check the JSON-file behind the Azure Logic App, you usually find a mess. If you try to use text editor for editing a Mule ESB flow, you will encounter problems.

Options

Given that the aim of an automated environment setup is great but ARM templates are hard to maintain, what can we do? I personally believe that instead of trying to make JSON to act like a programming language, we should use an actual programming language.

So instead of using an ARM template to describe your environment, you create a C# console application to describe and to create your environment using Azure Management Libraries for .NET.

Or if your environment is simple, you can use .bat-files (Azure CLI) or Powershell scripts (Azure Powershell) to automate your environment setup.

Conclusion

This post was aimed to give you the background. In the following posts I will explore and compare three options for automating your Azure environment setup:

  • ARM templates
  • Azure Management Libraries for .NET
  • Azure CLI

0 Comments

This post shows how to use Azure Service Bus Topics and filters to handle a scenario where events and event handers aren’t known when starting the system.

Background

One of our systems can contain 0 or 10 different event types. And it can contain 0 or 100 event handlers. The idea is that the event handlers can be added dynamically runtime. And to make things even more interesting, also the events can be added runtime. One event can have zero-n event handlers.

We use Azure Service Bus topics for the pub&sub model of communication.

The problem

The problem is that if we don’t know the types of events when starting the system, how can we easily create the required topics?

The solution

The solution was to only use one pre-defined topic and then to filter the communications using Azure Service Bus subscription filters.

More details

As the events and event handlers can change dynamically when the system is running, pre-creating all the Service Bus topics is cumbersome and not actually possible. To get around this there’s couple options:

  1. The event creator and event handler both try to create the Service Bus Topic if it doesn’t exists.
  2. All the event creators and handlers use the same pre-created topic and use message properties and subscription filters to handle only the relevant messages.

We ended up using the second option. So there’s only one topic (system-events) and all the event creators push their messages into the same topic.

When pushing the event, the event creator adds a property to message which defined the message’s type. For example newinvoice.

All the event handlers then subscribe to the same system-eventstopic. But when creating the subscription, they attach a filter to the subscription, indicating what types of messages they are interested in.

How to use the topic filters in C#

The official Azure GitHub contains a good sample of using Service Bus topic filters in C#.

Main thing is to specify the filter on event handler when creating the subscription:

  await namespaceManager.CreateSubscriptionAsync(
        "system-events",
        "newinvoicesubs"
        new SqlFilter("eventtype = 'newinvoice'));

Other thing to remember is to define the event type when pushing to the topic:

var message = new BrokeredMessage();
message.Properties = {{ "eventtype", "newinvoice" }};
await topicClient.SendAsync(message);