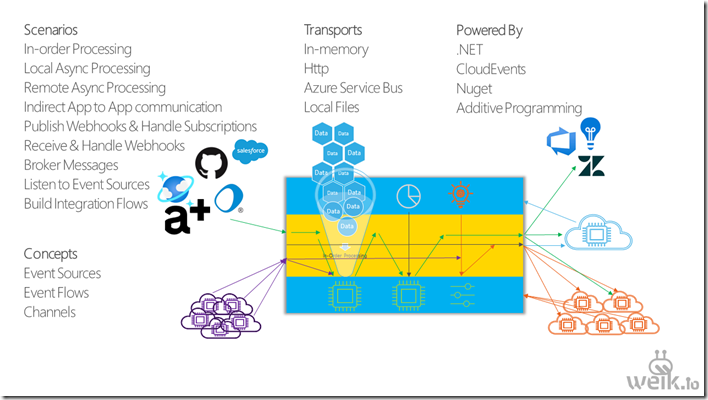
logo_2Event Framework is an Open Source CloudEvents Framework for .NET applications. You include it in your .NET Core 3.1/.NET 6 app and it helps you to create, receive, send and to handle CloudEvents. After reaching 1.0.0-alpha.0.100 (with the first alpha dating back to early 2020), Event Framework is now available in beta form, with the 1.0.0-beta.1.1 release.

How to get started

The easiest way to get started with Event Framework is to include the package Weikio.EventFramework.AspNetCore in your ASP.NET Core based application and then to register the required bits and pieces into service container:

services.AddEventFramework()

Main features

The main features of the Event Framework include:

1. Create CloudEvents using CloudEventCreator
2. Send & Receive CloudEvents using Channels and Event Sources
3. Build Event Flows

Weikio Scenarios

Here’s a short example of each of those:

Creating CloudEvents

Event Framework includes CloudEventCreator which can be used to transform .NET objects into CloudEvents. It can be customized and used through either a static CloudEventCreator.Create-method or using a CloudEventCreator instance.

var obj = new CustomerCreated(Guid.NewGuid(), "Test", "Customer");

// Object to event
var cloudEvent = CloudEventCreator.Create(obj);

// Object to event customization
var cloudEventCustomName = CloudEventCreator.Create(obj, eventTypeName: "custom-name");

For more examples, please see the following tests in the Github repo: https://github.com/weikio/EventFramework/tree/master/tests/unit/Weikio.EventFramework.UnitTests

Sending CloudEvents

Event Framework uses Channels when transporting and transforming events from a source to an endpoint. Channels have adapters, components and endpoints (+ interceptors) which are used to process an event. Channels can be build using a fluent builder or more manually.

https://mermaid.ink/img/pako:eNp1UctOwzAQ_JXI57YSHHNAKhAEUgWI5ujLJt40RvE68gMEVf-dTd2UkghbsmbH45ldeS9qq1DkounsZ92CC9nmTdLquShXL9U71mG5vLlrgQg7SSfA1GNZvl7W6-_ocIvuQ9d4G70kH6udg77Nzo8zXko7ttSWjikDs1bQB3R-iLGmt4QUfLo6W4ya_zxSowk_FRQNOqg6TASSmthNc-aGG7vjfh50x6mJSZjJ0gH5xjozcf81ZVFBqrd6PsiEnwePgqu_5fVF2PEYtlgIHtSAVvx9-0EhRWjRoBQ5Q4UNxC5IIenA0tgrCFgoHawTeQOdx4WAGOz2i2qRBxdxFN1r4HbNSXX4AdpIuLI

Here's an example where a channel is created using the fluent builder with a single HTTP endpoint. Every object sent to this channel is transformed to CloudEvent and then delivered using HTTP:

var channel = await CloudEventsChannelBuilder.From("myHttpChannel")
    .Http("https://webhook.site/3bdf5c39-065b-48f8-8356-511b284de874")
    .Build(serviceProvider);

await channel.Send(new CustomerCreatedEvent() { Age = 50, Name = "Test User" });

In many situations in your applications you don’t send messages directly into the channel. Instead you inject ICloudEventPublisher into your controller/service and use it to publish events to a particular channel or to the default channel:

public IntegrationEndpointService(ICloudEventPublisher eventPublisher)
{
    _eventPublisher = eventPublisher;
}

...

await _eventPublisher.Publish(new EndpointCreated()
{
    Name = endpoint.Name,
    Route = endpoint.Route,
    ApiName = endpoint.ApiName,
    ApiVersion = endpoint.ApiVersion,
    EndpointId = result.Id.GetValueOrDefault(),
});

Receiving CloudEvents

Event Framework supports Event Sources. An event source can be used to receive events (for example: HTTP, Azure Service Bus) but an event source can also poll and watch changes happening in some other system (like local file system).

es_gif

Here's an example where HTTP and Azure Service Bus are used to receive events in ASP.NET Core and then logged:

services.AddEventFramework()
    .AddChannel(CloudEventsChannelBuilder.From("logChannel")
        .Logger())
    .AddHttpCloudEventSource("events")
    .AddAzureServiceBusCloudEventSource(
        "Endpoint=sb://sb.servicebus.windows.net/;SharedAccessKeyName=RootManageSharedAccessKey;SharedAccessKey=YDcvmuL4=",
        "myqueue");

services.Configure<DefaultChannelOptions>(options => options.DefaultChannelName = "logChannel");

Building Event Flows

Event Sources and Channels can be combined into Event Flows. Event Flows also support branching and subflows.

Here's an example where an event source is used to track file changes in a local file system and then all the created files are reported using HTTP:

var flow = EventFlowBuilder.From<FileSystemEventSource>(options =>
    {
        options.Configuration = new FileSystemEventSourceConfiguration() { Folder = @"c:\\temp\\myfiles", Filter = "*.bin" };
    })
    .Filter(ev => ev.Type == "FileCreatedEvent" ? Filter.Continue : Filter.Skip)
    .Http("https://webhook.site/3bdf5c39-065b-48f8-8356-511b284de874");

services.AddEventFramework()
    .AddEventFlow(flow);

Coming Next

Current document is lacking and samples also need work. The hope is to be able to include as many components and event sources as possible and for these, we’re looking at maybe using Apache Camel to bootstrap things.

Project Home

Please visit the project home site at https://weik.io/eventframework for more details. Though for now, the details are quite thin.

Source code

Source code for Event Framework is available from https://github.com/weikio/EventFramework.

af_createRecently I blogged about API Framework, an open source project which aims to make building ASP.NET Core backends more flexible. One of the core functionalities API Framework provides is the ability to add new endpoints to the backend runtime, without having to rebuild and restart the system. This blog introduces how this can be done.

The Goal

The goal is to have ASP.NET Core based app which can add new endpoints using an UI. When a new endpoint is added, we want the backend’s OpenAPI document to automatically update.

Source Code

The source code for this blog post is available from GitHub: https://github.com/weikio/ApiFramework.Samples/tree/main/misc/RunTime

The Starting Point

We use ASP.NET Core 3.1 Razor Page application as a starting point. The template has been modified so that we can use Blazor components inside the Razor Pages. Blazor documentation provides a good step-by-step tutorial for this.

1. Adding API Framework

API Framework (AF) is the tool which allows us to add and remove endpoints runtime. API Framework is available as a Nuget package and there is a specific package which works as a good starting point for ASP.NET Core Web API projects in 3.1 apps but as we want to include Razor Pages, Blazor components and controllers inside a single ASP.NET Core app, it’s better to use the Weikio.ApiFramework.AspNetCore package.

The package which we want to add is Weikio.ApiFramework.AspNetCore. The current version is 1.1.0 so let’s add that to the application in addition to NSwag:

  <ItemGroup>
    <PackageReference Include="Weikio.ApiFramework.AspNetCore" Version="1.1.0"/>
    <PackageReference Include="NSwag.AspNetCore" Version="13.8.2" />
  </ItemGroup>

Then Startup.ConfigureServices is changed to include controllers, AF and OpenAPI documentation (provided by NSwag):

        public void ConfigureServices(IServiceCollection services)
        {
            services.AddRazorPages();
            services.AddServerSideBlazor();
            
            services.AddControllers();
            services.AddApiFramework();
            services.AddOpenApiDocument();
        }

And finally Startup.Configure is configured to include Controllers and Blazor & OpenAPI. AF uses the default controller mappings:

        public void Configure(IApplicationBuilder app, IWebHostEnvironment env)
        {
            app.UseDeveloperExceptionPage();

            app.UseHttpsRedirection();
            app.UseStaticFiles();

            app.UseRouting();

            app.UseAuthorization();

            app.UseOpenApi();
            app.UseSwaggerUi3();

            app.UseEndpoints(endpoints =>
            {
                endpoints.MapControllers();
                endpoints.MapRazorPages();
                endpoints.MapBlazorHub();
            });
        }

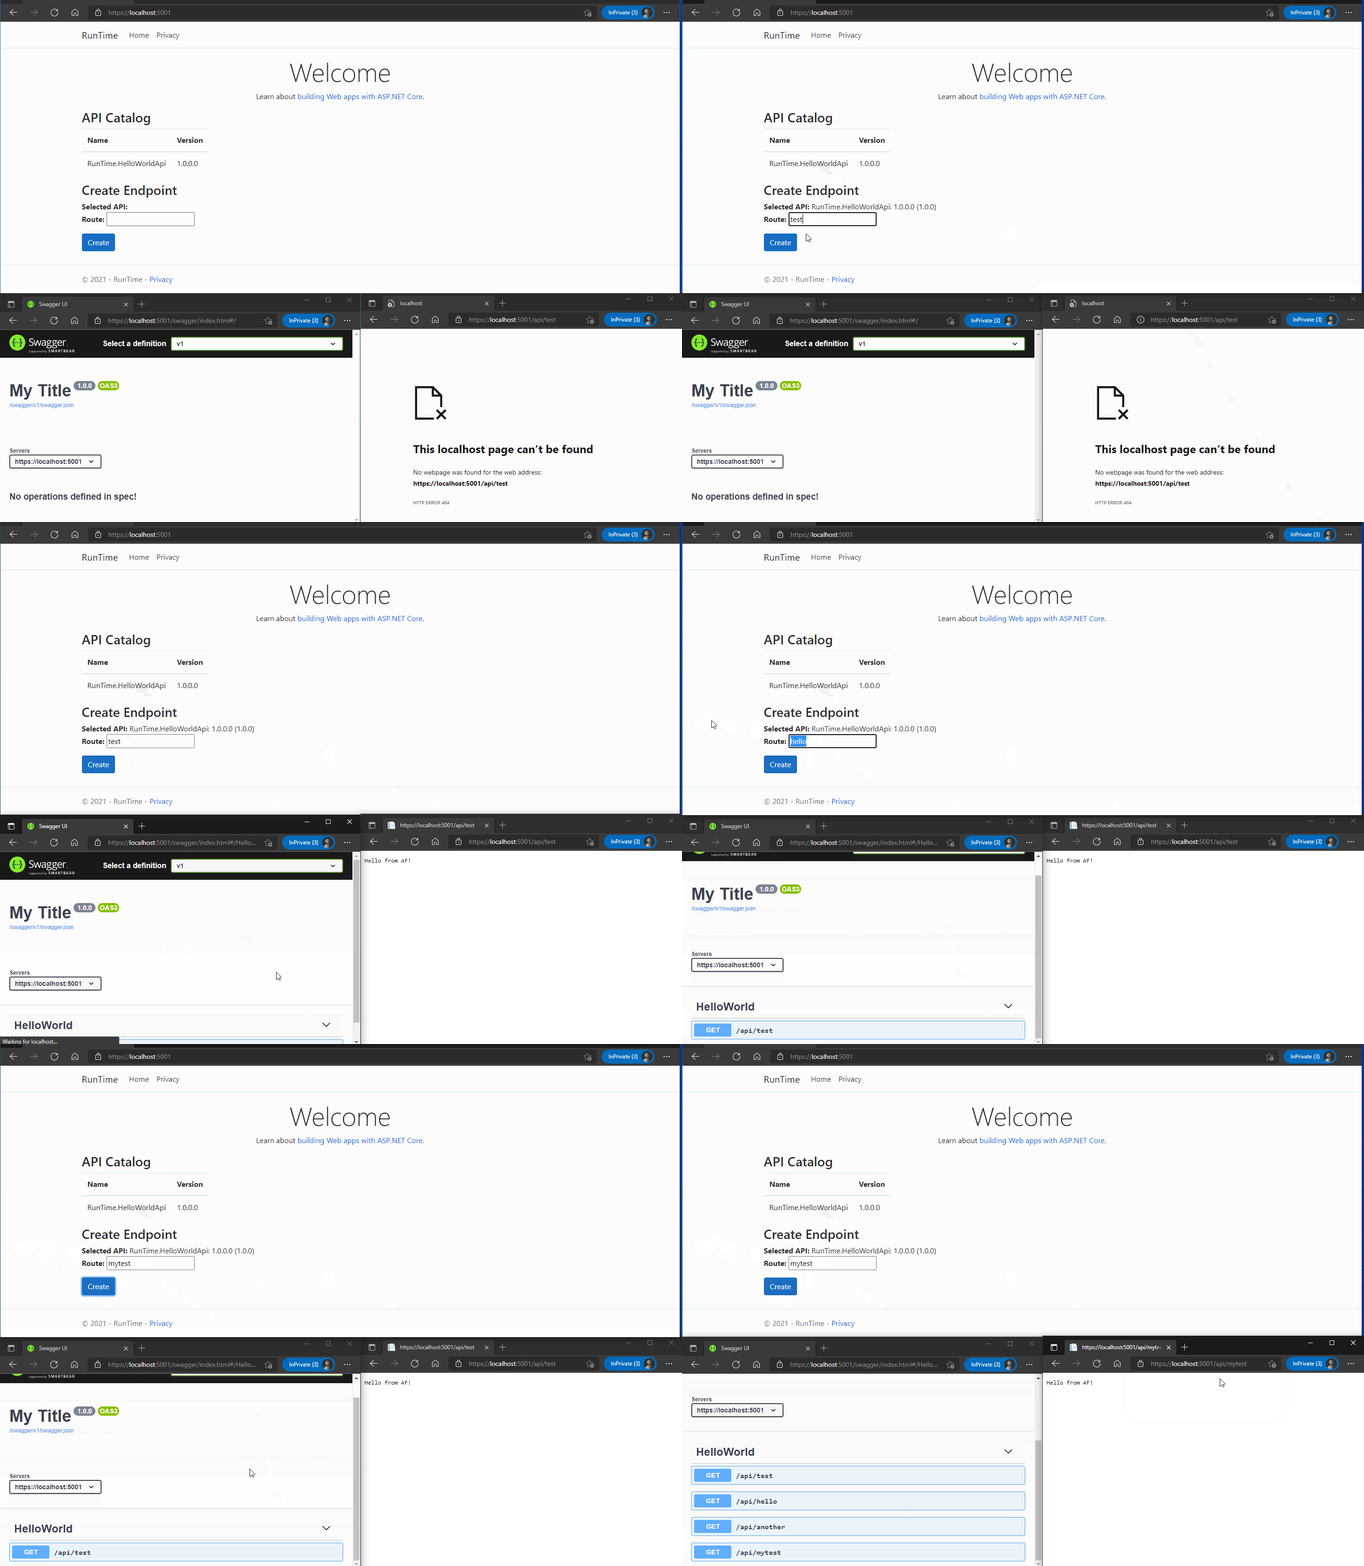
Now when we run the app, we shouldn’t see any obvious changes:

image

But if we navigate to /swagger, we should see all the endpoints provided by our app, which is none at this moment:
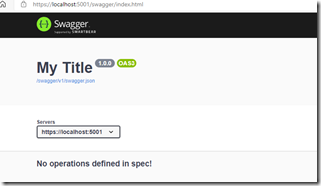
image

Now that we have the AF running, it’s time to build API.

2. Building an API

API in API Framework is a reusable component with a name, a version and the specific functionality the API provides. APIs can be build using plain C# or using tools like delegates, Roslyn scripts and more. The APIs are often redistributed as Nuget packages.

Let’s build the simplest API: The classic Hello World. We can use C# to build the API and the API is just a POCO, there’s no need to add routes or HTTP methods:

    public class HelloWorldApi
    {
        public string SayHello()
        {
            return "Hello from AF!";
        }
    }

And that’s it. Now, in AF an API itself is not accessible using HTTP. Instead, we can create 1 or many endpointsfrom the API. These endpoints can then be accessed using HTTP. In this blog we want to create an UI which can be used to create these endpoints runtime.

If we now run the application, nothing has changed as we haven’t created any endpoints.

API Framework keeps a catalog of available APIs. This means that we have to either register the APIs manually (using code or configuration) or we can let AF to auto register the APIs based on conventions. In this tutorial we can let AF to auto register the APIs and this can be turned on using the options:

            services.AddApiFramework(options =>
            {
                options.AutoResolveApis = true;
            });

Now we are in a good position. We have an API and we have registered it into AF’s API Catalog (or rather, we have let AF register it automatically). As we still haven’t created any endpoints, running the app doesn’t provide any new functionality.

The next step is to build the Blazor component for creating endpoints runtime.

3. Creating the UI

We have the AF configured and the first API ready and waiting so it’s time to build the UI which can be used to add endpoints runtime.

We start by creating an UI which lists all the APIs in AF’s API catalog. For this we need a new Blazor-component which we call EndpointManagement.razor:

<h3>API Catalog</h3>

@code {
    
}

API Catalog is browsable using the IApiProvider-interface. Here’s a component which gets all the APIs and creates a HTML table of them:

@using Weikio.ApiFramework.Abstractions

<h3>API Catalog</h3>

<table class="table table-responsive table-striped">
    <thead>
    <tr>
        <th>Name</th>
        <th>Version</th>
    </tr>
    </thead>
    <tbody>
    @foreach (var api in ApiProvider.List())
    {
        <tr>
            <td>@api.Name</td>
            <td>@api.Version</td>
        </tr>
    }
    </tbody>
</table>

@code {

    [Inject]
    IApiProvider ApiProvider { get; set; }

    protected override void OnInitialized()
    {
        base.OnInitialized();
    }

}

And now we can add the component to Index.cshtml:

@page
@model IndexModel
@{
    ViewData["Title"] = "Home page";
}

<div class="text-center">
    <h1 class="display-4">Welcome</h1>
    <p>Learn about <a href="https://docs.microsoft.com/aspnet/core">building Web apps with ASP.NET Core</a>.</p>
</div>

<component type="typeof(EndpointManagement)" render-mode="ServerPrerendered" />

And finally we have something new visible to show. Run the app and… the API Catalog table is empty:
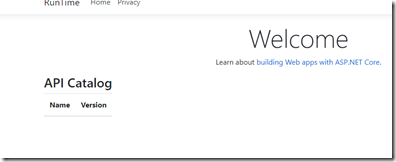
image

The reason for this is that the API Catalog is initialized in a background thread. AF supports dynamically created APIs and it sometimes can take minutes to create these so by default, AF does things on background.

F5 should fix the situation:
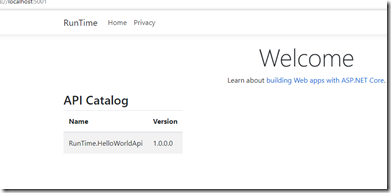
image

And there we have it, a catalog of APIs. If we at this point navigate to /swagger we can see that the list is still empty as we haven’t created any endpoints from the API:
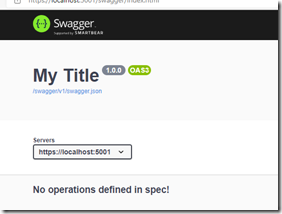
image

Let’s fix that and add the required UI for listing and creating the endpoints. For that we need IEndpointManager:

    [Inject]
    IEndpointManager EndpointManager { get; set; }

UI should be simple: user can select the API by clicking the row and then she can enter the route to the endpoint & click Create.

For this we add couple new properties to the component:

    ApiDefinition SelectedApi { get; set; }
    string EndpointRoute { get; set; }

And then a really simple UI which can be used to create the endpoint:

<h3>Create Endpoint</h3>
<strong>Selected API: </strong> @SelectedApi <br/>
<strong>Route: </strong><input @bind="EndpointRoute"/><br/>
<div class="mt-3"></div>
<button class="btn btn-primary" @onclick="Create">Create</button>

Finally, all that is left is the implementation of the Create-method. Creating an endpoint in runtime takes couple of things:

  • First we need to define the endpoint. The endpoint always contains the route and the API but it also can contain configuration. This means that we could create a configurable API and then create multiple endpoints from that single API, each having a different configuration.
  • Then we need to provide the new endpoint definition to the IEndpointManager.
  • Finally we tell IEndpointManager to Update. This makes the new endpoint accessible. This way it is possible to first add multiple endpoints and then with a single Update call make them all visible at the same time.

Here’s how we can define the endpoint:

var endpoint = new EndpointDefinition(EndpointRoute, SelectedApi);

Then we can use CreateAndAdd method to actually the create the endpoint using the definition and to add it into the system with a single call:

        EndpointManager.CreateAndAdd(endpoint);

And now we just ask EndpointManager to update itself. At this point it goes through all the endpoints and initializes the new ones and updates the changed ones:

EndpointManager.Update();

Here’s the full Create-method:

    private void Create()
    {
        var endpoint = new EndpointDefinition(EndpointRoute, SelectedApi);
        
        EndpointManager.CreateAndAdd(endpoint);
        
        EndpointManager.Update();
    }

And here’s what we see when we run the app:
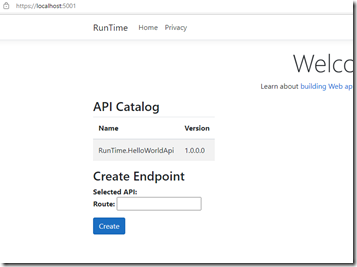
image

Now we can actually test if our setup works. Click the API from API Catalog, then provide route (for example /test) and finally click Create.
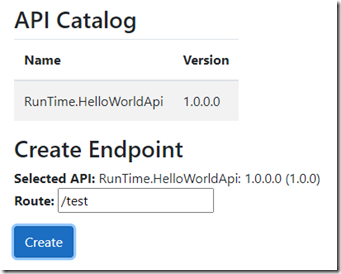
image

Maybe something happened, even though our UI doesn’t give any feedback. Navigating to /api/test should tell us more… And there it is!

image

Now if we check /swagger we should see the new endpoint:
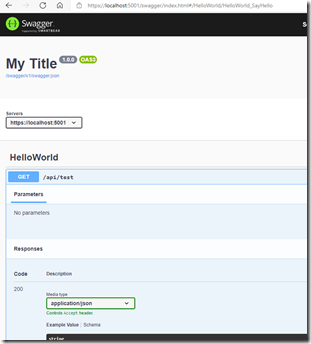
image

Excellent. Try adding couple more endpoints, like /hello and /world and make sure things work as expected:
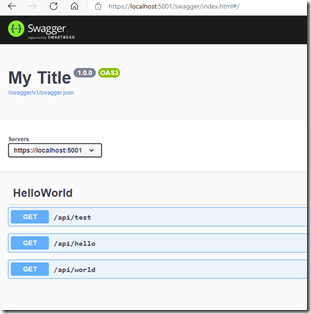
image

That’s it. We now have an ASP.NET Core backend which can be modified runtime.

If you wonder why the endpoint is available form /api/test and not from /test, it is because the AF by default uses the /api prefix for all the endpoints. This can be configured using options.

Conclusion

In this blog we modified an ASP.NET Core 3.1 based application so that it supports runtime changes. Through these runtime changes we can add new endpoints without having to rebuild or to restart the app. The code is available from https://github.com/weikio/ApiFramework.Samples/tree/main/misc/RunTime.

This blog works more as an introduction to the subject as we used only one API and that was the simplest possible, the Hello World. But we will expand from this and here’s some ideas of things to explore, all supported by API Framework:

  • Removing an endpoint runtime
  • Creating endpoints from an API which requires configuration
  • Listing endpoints
  • Viewing endpoint’s status
  • Creating the APIs (not endpoints) runtime using C#
  • Creating an endpoint runtime from an API distributed as a Nuget package.

To read more about API Framework, please visit the project’s home pages at https://weik.io/apiframework. The AF’s source code is available from GitHub and documentation can be found from https://docs.weik.io/apiframework/.

Plugin Framework Logo

New version of Plugin Framework for .NET adds support for reading plugin catalog configuration from appsettings.json and improves plugin tagging. The release is now available through Nuget: https://www.nuget.org/packages/Weikio.PluginFramework/

For those who are not familiar with Plugin Framework, it is a plugin platform for .NET applications, including ASP.NET Core, Blazor, WPF, Windows Forms and Console apps. It is light-weight and easy to integrate and supports multiple different plugin catalogs, including .NET assemblies, Nuget packages and Roslyn scripts.

Here’s an introduction post about Plugin Framework. InfoQ did a an article about the framework, it’s available from their site.

The 1.1.0 release

I’m especially happy with the support for appsettings.json as it’s the first community contribution (thanks @panoukos41 (github.com)!) and as it also enables new scenarios for the framework. Folder and assembly catalogs can be configured with the following syntax (support for more catalog types is coming in the upcoming versions):

  "PluginFramework": {
    "Catalogs": [
      {
        "Type": "Folder",
        "Path": "..\\Shared\\Weikio.PluginFramework.Samples.SharedPlugins\\bin\\debug\\netcoreapp3.1"
      },
      {
        "Type": "Assembly",
        "Path": ".\\bin\\Debug\\netcoreapp3.1\\WebAppPluginsLibrary.dll"
      }
    ]
  }

Sample for this specific feature is available from https://github.com/weikio/PluginFramework/tree/master/samples/WebAppWithAppSettings

New version also improves the plugin tagging. The idea behind plugin tagging is that Plugin Framework can for example scan a folder of dlls and tag the found plugins based on the given criteria. The developer can then use the plugins based on their tags. This is useful in situations where the application supports multiple types of plugins.

Here’s an example where all the found plugins are tagged as “operator”:

            var folderPluginCatalog = new FolderPluginCatalog(@"..\..\..\..\Shared\Weikio.PluginFramework.Samples.SharedPlugins\bin\debug\netcoreapp3.1",
                type => { type.Implements<IOperator>().Tag("operator"); });

And another part of the same app tags plugins as “dialog”:

            var folderCatalog = new FolderPluginCatalog(@"..\..\..\..\WinFormsPluginsLibrary\bin\debug\netcoreapp3.1",
                type =>
                {
                    type.Implements<IDialog>()
                        .Tag("dialog");
                });

Now when these plugins are used in the application, they can be fetched using the tags. Here’s an example where the “operator” and “dialog” tags are used:

        private void AddCalculationOperators()
        {
            var allPlugins = _allPlugins.GetByTag("operator");
            foreach (var plugin in allPlugins)
            {
                listBox1.Items.Add(plugin);
            }
        }

        private void AddDialogs()
        {
            var dialogPlugins = _allPlugins.GetByTag("dialog");
            
            foreach (var dialogPlugin in dialogPlugins)
            {
                var menuItem = new ToolStripButton(dialogPlugin.Name, null, (o, args) =>
                {
                    var instance = (IDialog) Activator.CreateInstance(dialogPlugin);
                    instance.Show();
                });

                dialogPluginsToolStripMenuItem.DropDownItems.Add(menuItem);
            }
        }

Sample for plugin tagging is available from https://github.com/weikio/PluginFramework/tree/master/samples/WinFormsApp

What’s next?

Work will continue on improving (and adding new) plugin catalogs but the main thing for the next release is the support for .NET 5. This will enable one scenario which hasn’t been that well supported: Using Plugin Framework in WebAssembly version of Blazor.

Plugin Framework Logo

Plugin Framework is a new MIT-licensed plugin platform for .NET Core applications. It is light-weight and easy way to add a plugin-support into your application. It supports all the major types of .NET Core applications, including ASP.NET Core, Blazor, Console Apps and WPF & WinForms.Plugin Framework has a built-in support for Nuget packages and feeds.

The Plugin Framework version 1.0.0 is now available from Nuget: https://www.nuget.org/packages/Weikio.PluginFramework/. For Blazor and ASP.NET Core applications the recommended package is https://www.nuget.org/packages/Weikio.PluginFramework.AspNetCore

Main features

Plugin Framework follows an "Everything is a plugin" -mentality. It provides out of the box support for sharing plugins using Nuget packages, Roslyn scripts and delegates, in addition to the more common ones like .NET assemblies and folders.

Here’s a short summary of the major features provided by Plugin Framework:

  • Deliver plugins as Nuget-packages, .NET assemblies, Roslyn scripts and more.
  • Easy integration into a new or an existing .NET Core application.
  • Automatic dependency management.
  • MIT-licensed, commercial support available.

Quick start: ASP.NET Core

Install-Package Weikio.PluginFramework.AspNetCore

Using Plugin Framework can be as easy as adding a single new line into ConfigureServices. The following code finds all the plugins (types that implement the custom IOperator-interface) from the myplugins-folder.

services.AddPluginFramework<IOperator>(@".\myplugins");

The plugins can be used in a controller using constructor injection:

public CalculatorController(IEnumerable<IOperator> operator)
{
	_operators = operators;
}

Getting started

Best way to learn more about Plugin Framework is through the project's home page at Github: https://github.com/weikio/PluginFramework. The repository contains multiple different samples at the time of writing this. Here's a list:

Plugin Framework & .NET Console Application
Plugin Framework & ASP.NET Core
Plugin Framework & Blazor
Plugin Framework & WPF App
Nuget & Plugin Framework & ASP.NET Core
Roslyn & Plugin Framework & ASP.NET Core
Delegates & Plugin Framework & ASP.NET Core

How does this work?

When you create your application and add support for Plugin Framework, you usually define two things:

1. The specifications for the plugins. In some applications a plugin can add new functionality into the UI. In other apps, plugins are used to distribute logs into multiple different systems. The application defines what kind of extensions it supports.

2. The locations where the application can find the plugins. Many applications use a specific “plugins”-folder to indicate the location where plugins should exist in the hard drive. In some situations plugins are installed in runtime from Nuget. These plugin locations are called catalogs. As a developer you define what catalogs your application uses.

What makes a plugin?

In the context of the Plugin Framework, plugin is a single .NET Type. For some applications a plugin is a type which implements a specific interface. In some applications a plugin is a type which has a single public method called Run. Attributes are often used to indicate the plugins and that is also supported by Plugin Framework. From the Plugin Framework's point of view anything or everything can be a plugin.

What is a plugin catalog?

Each plugin is part of a catalog. Plugin Framework provides the following officially supported catalogs:

  • Type
  • Assembly
  • Folder
  • Delegate
  • Roslyn script
  • Nuget package
  • Nuget feed

License & Source code & Commercial Support & Issue Tracking

As previously mentioned, Plugin Framework is MIT-licensed and its source code is available from GitHub: https://github.com/weikio/PluginFramework. GitHub also contains the issue tracking.

There is also commercial support available for Plugin Framework. That is provided by Adafy https://adafy.com. Though the website is only in Finnish, the support is available both in English and in Finnish.

0 Comments

Null conditional operator allows us to write more terse code. And unfortunately, more subtle bugs. The combination of Null Conditional Operator with Any() is easily my current favourite for The Winner of 2019’s Most Bugs Caused by a New C# Feature.

Combining Null Conditional Operator ?. with System.Linq.Enumerable.Any allows us to quickly check if our collection is not null AND not empty. So instead of writing this:

        public static void DoWork(List myWorkItems)
        {
            if (myWorkItems != null && myWorkItems.Any())
            {
                Console.WriteLine("Doing work");
                return;
            }

            Console.WriteLine("Nothing to do");
        }

We can use Null Conditional Operator and save few key strokes:

        public static void DoWork(List myWorkItems)
        {
            if (myWorkItems?.Any() == true)
            {
                Console.WriteLine("Doing work");
                return;
            }

            Console.WriteLine("Nothing to do");
        }

Maybe we could make the code even better, by reducing nesting by inverting the if:

        public static void DoWork(List myWorkItems)
        {
            if (myWorkItems?.Any() == false)
            {
                Console.WriteLine("Nothing to do");
                return;
            }

            Console.WriteLine("Doing work");
        }

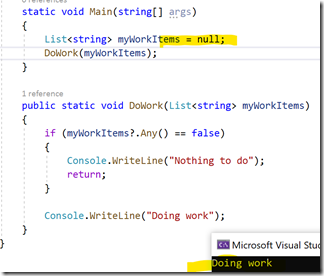
Ah, no. Did you spot the bug?

image

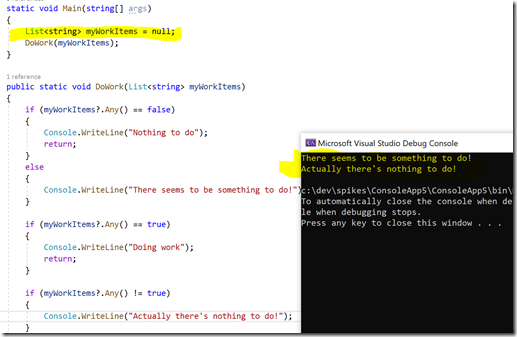
If we expand the example, we get a better picture of the situation:

image

Why this happens? Because myWorkItems?.Any() doesn’t return false when the collection is null. It returns Nullable Boolean instead:

image

Getting around the issue is quite simple: Instead of checking for == false, we check for != true:

            if (myWorkItems?.Any() != true)
            {
                Console.WriteLine("Nothing to do");
                return;
            }

But do we always remember this? Based on the code I’ve seen this year the answer is quite simply no.

Maybe there’s a Roslyn Analyzer for spotting this automatically?