17 Comments

It's hard to schedule tasks on Azure: The platform doesn't have built-in support for executing custom code based on a schedule. There's some options to get around this though, for example:

  • Azure VM and the Windows Task Scheduler
  • Azure Service Bus and ScheduledEnqueueTimeUTC

But these have some limitations which may be hard to get around: In the case of a VM, if it goes down, everything stops. With Azure Service Bus you need some service which handles the scheduling.

This is where the Quartz.net fits in. Quartz.net is a flexible and easy-to-use library for running scheduled tasks. And it works great on Azure.

Here's some highlights of Quartz.net's features:

  • Supports clusters
  • Can use SQL Azure
  • Cron-style syntax for scheduling tasks

In this tutorial we build a Quartz.net (version 2.0.1) cluster using SQL Azure and ASP.NET.

The database

First we need to set-up the SQL Azure database. Quartz.net will persist all the job details and triggers to this database. Easiest way to create the required tables is to use Management Studio to log in to the database and to execute the Quartz.net database schema creation script.
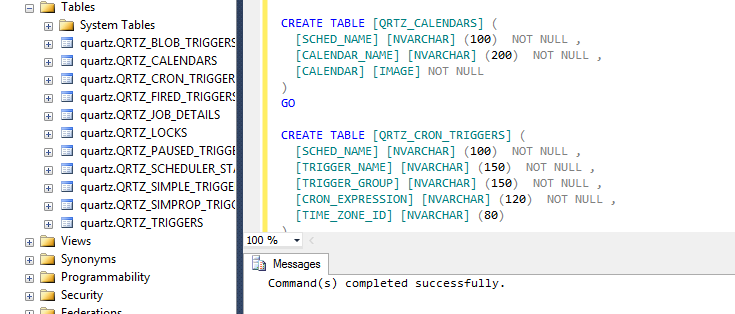
And that's it for the database. Next step is to build the service for running the Quartz.net.

The ASP.NET project

The SQL Azure store is ready and now we need a service which will run actions based on the triggers. The service can be almost anything: a console app, a Windows Service or an ASP.NET project. In this tutorial we're going to use an ASP.NET project which is deployed to two extra small Cloud Service instances.

Here are the steps required for creating the service:

  1. Create new project with template "ASP.NET Empty Web Application"
  2. Use NuGet to install package "Quartz"
  3. Add New Item to project using template "Global Application Class" (global.asax)

Modify the Global.asax.cs so that the Quartz.net starts and stop with the application:

using System;
using Common.Logging;
using Quartz;
using Quartz.Impl;

namespace QuarzApp
{
    public class Global : System.Web.HttpApplication
    {
        public static IScheduler Scheduler;

        protected void Application_Start(object sender, EventArgs e)
        {
            ISchedulerFactory sf = new StdSchedulerFactory();
            Scheduler = sf.GetScheduler();

            Scheduler.Start();
        }

        protected void Application_End(object sender, EventArgs e)
        {
            Scheduler.Shutdown();
        }
    }

}

And finally modify the Web.config to include the Quartz.net configuration:

<?xml version="1.0"?>
<configuration>

  <configSections>
    <section name="quartz" type="System.Configuration.NameValueSectionHandler, System, Version=1.0.5000.0,Culture=neutral, PublicKeyToken=b77a5c561934e089" />
    <sectionGroup name="common">
      <section name="logging" type="Common.Logging.ConfigurationSectionHandler, Common.Logging"/>
    </sectionGroup>
  </configSections>

  <system.web>
    <compilation debug="true" targetFramework="4.5" />
    <httpRuntime targetFramework="4.5" />
  </system.web>

  <common>
    <logging>
      <factoryAdapter type="Common.Logging.Simple.TraceLoggerFactoryAdapter, Common.Logging">
        <arg key="showLogName" value="true"/>
        <arg key="showDataTime" value="true"/>
        <arg key="level" value="INFO"/>
        <arg key="dateTimeFormat" value="HH:mm:ss:fff"/>
      </factoryAdapter>
    </logging>
  </common>

  <quartz>
    <add key="quartz.scheduler.instanceName" value="MyScheduler" />
    <add key="quartz.scheduler.instanceId" value="AUTO" />

    <add key="quartz.threadPool.type" value="Quartz.Simpl.SimpleThreadPool, Quartz" />
    <add key="quartz.threadPool.threadCount" value="5" />
    <add key="quartz.threadPool.threadPriority" value="Normal" />

    <add key="quartz.jobStore.useProperties" value="true" />
    <add key="quartz.jobStore.clustered" value="true" />
    <add key="quartz.jobStore.misfireThreshold" value="60000" />
    <add key="quartz.jobStore.type" value="Quartz.Impl.AdoJobStore.JobStoreTX, Quartz" />
    <add key="quartz.jobStore.tablePrefix" value="QRTZ_" />

    <add key="quartz.jobStore.driverDelegateType" value="Quartz.Impl.AdoJobStore.SqlServerDelegate, Quartz" />

    <add key="quartz.jobStore.dataSource" value="myDS" />

    <add key="quartz.dataSource.myDS.connectionString" value="Server=tcp:myserver.database.windows.net,1433;Database=mydatabase;User ID=myuser@myserver;Password=mypassword;Trusted_Connection=False;Encrypt=True;Connection Timeout=30;" />
    <add key="quartz.dataSource.myDS.provider" value="SqlServer-20" />
  </quartz>

</configuration>

That's it. The service for running the scheduled jobs is ready. As the last step we're going to create a simple job and a schedule for it.

Example job

All the bits and pieces are ready and only thing left is to test out the service. For that we need a job to execute and a trigger which will handle the execution.
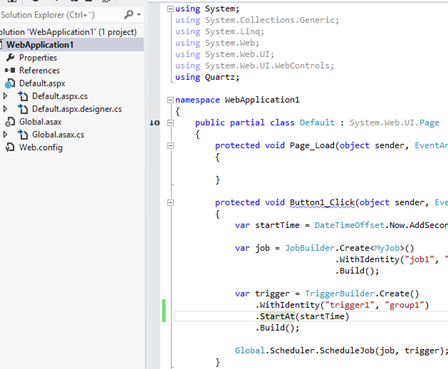
The Quartz.net jobs implement a simple IJob interface. The following job will log a message when it is executed:

    public class MyJob : IJob
    {
        private static ILog logging = LogManager.GetLogger(typeof (MyJob));

        public void Execute(IJobExecutionContext context)
        {
            var mydata = context.MergedJobDataMap["data"];

            logging.InfoFormat("Hello from job {0}", mydata);
        }
    }

To execute a job we need a trigger for it. Here's an example code which will add a single trigger for the job, making it to execute after 15 seconds has passed. Create a Web Form "Default.aspx" to the project, add a button to it and in its click handler create a new trigger and add it to the scheduler:

        protected void Button1_Click(object sender, EventArgs e)
        {
            var startTime = DateTimeOffset.Now.AddSeconds(15);

            var job = JobBuilder.Create<MyJob>()
                                .WithIdentity("job1", "group1")
                                .Build();

            var trigger = TriggerBuilder.Create()
                .WithIdentity("trigger1", "group1")
                .StartAt(startTime)
                .Build();

            Global.Scheduler.ScheduleJob(job, trigger);
        }

Deployment and application pools

As the service uses ASP.NET, it can be deployed to Azure Web Sites or to Azure Cloud Services. One thing to keep in mind is that the IIS will recycle the application pools automatically. This will shut down the application and the Quartz.net with it. To get around this limitation, it may be wise to change the application pool's recycling interval to 0.

Another option is to create Quarz.net job which "pings" the current web site once in every 10 minutes or to use some other keep-alive service for the pinging.

Links

99 Comments

MongoDB version 2.2 was released in late August and the biggest change it brought was the addition of the Aggregation Framework. Previously the aggregations required the usage of map/reduce, which in MongoDB doesn’t perform that well, mainly because of the single-threaded Javascript-based execution.  The aggregation framework steps away from the Javascript and is implemented in C++, with an aim to accelerate performance of analytics and reporting up to 80 percent compared to using MapReduce.

The aim of this post is to show examples of running the MongoDB Aggregation Framework with the official MongoDB C# drivers.

Aggregation Framework and Linq

Even though the current version of the MongoDB C# drivers (1.6) supports Linq, the support doesn’t extend to the aggregation framework. It’s highly probable that the Linq-support will be added later on and there’s already some hints about this in the driver’s source code. But at this point the execution of the aggregations requires the usage of the BsonDocument-objects.

Aggregation Framework and GUIDs

If you use GUIDs in your documents, the aggregation framework doesn’t work. This is because by default the GUIDs are stored in binary format and the aggregations won’t work against documents which contain binary data.. The solution is to store the GUIDs as strings. You can force the C# drivers to make this conversion automatically by configuring the mapping. Given that your C# class has Id-property defined as a GUID, the following code tells the driver to serialize the GUID as a string:

BsonClassMap.RegisterClassMap<MyClass>(cm => 
{ 
    cm.AutoMap(); 
    cm.GetMemberMap(c => c.Id) 
      .SetRepresentation( 
          BsonType.String); 
});

The example data

These examples use the following documents:

> db.examples.find()
{ "_id" : "1", "User" : "Tom", "Country" : "Finland", "Count" : 1 }
{ "_id" : "2", "User" : "Tom", "Country" : "Finland", "Count" : 3 }
{ "_id" : "3", "User" : "Tom", "Country" : "Finland", "Count" : 2 }
{ "_id" : "4", "User" : "Mary", "Country" : "Sweden", "Count" : 1 }
{ "_id" : "5", "User" : "Mary", "Country" : "Sweden", "Count" : 7 }

Example 1: Aggregation Framework Basic usage

This example shows how the aggregation framework can be executed through C#. We’re not going run any calculations to the data, we’re just going to filter it by the User.

To run the aggregations, you can use either the MongoDatabase.RunCommand –method or the helper MongoCollection.Aggregate. We’re going to use the latter:

var coll = localDb.GetCollection("examples"); 
... 
coll.Aggregate(pipeline);

The hardest part when working with Aggregation Framework through C# is building the pipeline. The pipeline is similar concept to the piping in PowerShell. Each operation in the pipeline will make modifications to the data: the operations can for example filter, group and project the data. In C#, the pipeline is a collection of BsonDocument object. Each document represents one operation.

In our first example we need to do only one operation: $match. This operator will filter out the given documents. The following BsonDocument is a pipeline operation which filters out all the documents which don’t have User-field set to “Tom”.

var match = new BsonDocument 
                { 
                    { 
                        "$match", 
                        new BsonDocument 
                            { 
                                {"User", "Tom"} 
                            } 
                    } 
                };

To execute this operation we add it to an array and pass the array to the MongoCollection.Aggregate-method:

var pipeline = new[] { match }; 
var result = coll.Aggregate(pipeline);

The MongoCollection.Aggregate-method returns an AggregateResult-object. It’s ResultDocuments-property (IEnumarable<BsonDocument>) contains the documents which are the output of the aggregation. To check how many results there were, we can get the Count:

var result = coll.Aggregate(pipeline); 
Console.WriteLine(result.ResultDocuments.Count());

image

The result documents are BsonDocument-objects. If you have a C#-class which represent the documents, you can cast the results:

var matchingExamples = result.ResultDocuments 
    .Select(BsonSerializer.Deserialize<ExampleData>) 
    .ToList();

foreach (var example in matchingExamples) 
{ 
    var message = string.Format("{0} - {1}", example.User, example.Count); 
    Console.WriteLine(message); 
}

image

Another alternative is to use C#’s dynamic type. The following extension method uses JSON.net to convert a BsonDocument into a dynamic:

public static class MongoExtensions 
{ 
    public static dynamic ToDynamic(this BsonDocument doc) 
    { 
        var json = doc.ToJson(); 
        dynamic obj = JToken.Parse(json); 
        return obj; 
    } 
}

Here’s a way to convert all the result documents into dynamic objects:

var matchingExamples = result.ResultDocuments 
    .Select(x => x.ToDynamic()) 
    .ToList();

Example 2: Multiple filters & comparison operators

This example filters the data with the following criteria:

  • User: Tom
  • Count: >= 2
var match = new BsonDocument 
                { 
                    { 
                        "$match", 
                        new BsonDocument 
                            { 
                                {"User", "Tom"}, 
                                {"Count", new BsonDocument 
                                                   { 
                                                       { 
                                                           "$gte", 2 
                                                       } 
                                                   }} 
                            } 
                    } 
                };

The execution of this operation is identical to the first example:

var pipeline = new[] { match }; 
var result = coll.Aggregate(pipeline);
var matchingExamples = result.ResultDocuments 
    .Select(x => x.ToDynamic()) 
    .ToList();

Also the result are as expected:

foreach (var example in matchingExamples) 
{ 
    var message = string.Format("{0} - {1}", example.User, example.Count); 
    Console.WriteLine(message); 
}

image

Example 3: Multiple operations

In our first two examples, the pipeline was as simple as possible: It contained only one operation. This example will filter the data with the same exact criteria as the second example, but this time using two $match operations:

    • User: Tom
    • Count: >= 2

var match = new BsonDocument 
                { 
                    { 
                        "$match", 
                        new BsonDocument 
                            { 
                                {"User", "Tom"} 
                            } 
                    } 
                };
var match2 = new BsonDocument 
                { 
                    { 
                        "$match", 
                        new BsonDocument 
                            { 
                                {"Count", new BsonDocument 
                                                   { 
                                                       { 
                                                           "$gte", 2 
                                                       } 
                                                   }} 
                            } 
                    } 
                };

var pipeline = new[] { match, match2 };

The output stays the same:

image

The first operation “match” takes all the documents from the examples collection and removes every document which doesn’t match the criteria User = Tom. The output of this operation (3 documents) then moves to the second operation “match2” of the pipeline. This operation only sees those 3 documents, not the original collection. The operation filters out these documents based on its criteria and moves the result (2 documents) forward. This is where our pipeline ends and this is also our result.

Example 4: Group and sum

Thus far we’ve used the aggregation framework to just filter out the data. The true strength of the framework is its ability to run calculations on the documents. This example shows how we can calculate how many documents there are in the collection, grouped by the user. This is done using the $group-operator:

var group = new BsonDocument 
                { 
                    { "$group", 
                        new BsonDocument 
                            { 
                                { "_id", new BsonDocument 
                                             { 
                                                 { 
                                                     "MyUser","$User" 
                                                 } 
                                             } 
                                }, 
                                { 
                                    "Count", new BsonDocument 
                                                 { 
                                                     { 
                                                         "$sum", 1 
                                                     } 
                                                 } 
                                } 
                            } 
                  } 
                };

The grouping key (in our case the User-field) is defined with the _id. The above example states that the grouping key has one field (“MyUser”) and the value for that field comes from the document’s User-field ($User). In the $group operation the other fields are aggregate functions. This example defines the field “Count” and adds 1 to it for every document that matches the group key (_id).

var pipeline = new[] { group }; 
var result = coll.Aggregate(pipeline);

var matchingExamples = result.ResultDocuments 
    .Select(x => x.ToDynamic()) 
    .ToList();

foreach (var example in matchingExamples) 
{ 
    var message = string.Format("{0} - {1}", example._id.MyUser, example.Count); 
    Console.WriteLine(message); 
}

image

Note the format in which the results are outputted: The user’s name is accessed through _id.MyUser-property.

Example 5: Group and sum by field

This example is similar to example 4. But instead of calculating the amount of documents, we calculate the sum of the Count-fields by the user:

var group = new BsonDocument 
                { 
                    { "$group", 
                        new BsonDocument 
                            { 
                                { "_id", new BsonDocument 
                                             { 
                                                 { 
                                                     "MyUser","$User" 
                                                 } 
                                             } 
                                }, 
                                { 
                                    "Count", new BsonDocument 
                                                 { 
                                                     { 
                                                         "$sum", "$Count" 
                                                     } 
                                                 } 
                                } 
                            } 
                  } 
                };

The only change is that instead of adding 1, we add the value from the Count-field (“$Count”).

image

Example 6: Projections

This example shows how the $project operator can be used to change the format of the output. The grouping in example 5 works well, but to access the user’s name we currently have to point to the _id.MyUser-property. Let’s change this so that user’s name is available directly through UserName-property:

var group = new BsonDocument 
                { 
                    { "$group", 
                        new BsonDocument 
                            { 
                                { "_id", new BsonDocument 
                                             { 
                                                 { 
                                                     "MyUser","$User" 
                                                 } 
                                             } 
                                }, 
                                { 
                                    "Count", new BsonDocument 
                                                 { 
                                                     { 
                                                         "$sum", "$Count" 
                                                     } 
                                                 } 
                                } 
                            } 
                  } 
                };

var project = new BsonDocument 
                { 
                    { 
                        "$project", 
                        new BsonDocument 
                            { 
                                {"_id", 0}, 
                                {"UserName","$_id.MyUser"}, 
                                {"Count", 1}, 
                            } 
                    } 
                };

var pipeline = new[] { group, project };

The code removes the _id –property from the output. It adds the UserName-property, which value is accessed from field _id.MyUser. The projection operations also states that the Count-value should stay as it is.

var matchingExamples = result.ResultDocuments 
    .Select(x => x.ToDynamic()) 
    .ToList();

foreach (var example in matchingExamples) 
{ 
    var message = string.Format("{0} - {1}", example.UserName, example.Count); 
    Console.WriteLine(message); 
}

image

Example 7: Group with multiple fields in the keys

For this example we add a new row into our document collection, leaving us with the following:

{ "_id" : "1", "User" : "Tom", "Country" : "Finland", "Count" : 1 }
{ "_id" : "2", "User" : "Tom", "Country" : "Finland", "Count" : 3 }
{ "_id" : "3", "User" : "Tom", "Country" : "Finland", "Count" : 2 }
{ "_id" : "4", "User" : "Mary", "Country" : "Sweden", "Count" : 1 }
{ "_id" : "5", "User" : "Mary", "Country" : "Sweden", "Count" : 7 }
{ "_id" : "6", "User" : "Tom", "Country" : "England", "Count" : 3 }

This example shows how you can group the data by using multiple fields in the grouping key:

var group = new BsonDocument 
                { 
                    { "$group", 
                        new BsonDocument 
                            { 
                                { "_id", new BsonDocument 
                                             { 
                                                 { "MyUser","$User" }, 
                                                 { "Country","$Country" }, 
                                             } 
                                }, 
                                { 
                                    "Count", new BsonDocument 
                                                 { 
                                                     { "$sum", "$Count" } 
                                                 } 
                                } 
                            } 
                  } 
                };

var project = new BsonDocument 
                { 
                    { 
                        "$project", 
                        new BsonDocument 
                            { 
                                {"_id", 0}, 
                                {"UserName","$_id.MyUser"}, 
                                {"Country", "$_id.Country"}, 
                                {"Count", 1}, 
                            } 
                    } 
                };

var pipeline = new[] { group, project }; 
var result = coll.Aggregate(pipeline);

var matchingExamples = result.ResultDocuments 
    .Select(x => x.ToDynamic()) 
    .ToList();

foreach (var example in matchingExamples) 
{ 
    var message = string.Format("{0} - {1} - {2}", example.UserName, example.Country, example.Count); 
    Console.WriteLine(message); 
}

image

Example 8: Match, group and project

This example shows how you can combine many different pipeline operations. The data is first filtered ($match) by User=Tom, then grouped by the Country (“$group”) and finally the output is formatted into a readable format ($project).

Match:

var match = new BsonDocument 
                { 
                    { 
                        "$match", 
                        new BsonDocument 
                            { 
                                {"User", "Tom"} 
                            } 
                    } 
                };

Group:

var group = new BsonDocument 
                { 
                    { "$group", 
                        new BsonDocument 
                            { 
                                { "_id", new BsonDocument 
                                             { 
                                                 { "Country","$Country" }, 
                                             } 
                                }, 
                                { 
                                    "Count", new BsonDocument 
                                                 { 
                                                     { "$sum", "$Count" } 
                                                 } 
                                } 
                            } 
                  } 
                };

Project:

var project = new BsonDocument 
                { 
                    { 
                        "$project", 
                        new BsonDocument 
                            { 
                                {"_id", 0}, 
                                {"Country", "$_id.Country"}, 
                                {"Count", 1}, 
                            } 
                    } 
                };

Result:

var pipeline = new[] { match, group, project }; 
var result = coll.Aggregate(pipeline);

var matchingExamples = result.ResultDocuments 
    .Select(x => x.ToDynamic()) 
    .ToList();

foreach (var example in matchingExamples) 
{ 
    var message = string.Format("{0} - {1}", example.Country, example.Count); 
    Console.WriteLine(message); 
}

image

More

There are many other interesting operators in the MongoDB Aggregation Framework, like $unwind and $sort. The usage of these operators is identical to ones we used above so it should be possible to copy-paste one of the examples and use it as a basis for these other operations.

Links

6 Comments

The Windows Phone analytics service Wensus uses KendoUI DataViz components to draw the reports. The DataViz documentation is good but I think that there can never be enough examples. So, here’s few more. All the examples are available through jsFiddle.

image

The examples have been tested with KendoUI version 2012.2.710.

Bar chart with the margins removed between series

By default, if you create a Bar Chart with multiple series, there’s a margin between the bars which represent different series.

image

To make the chart more readable, it may be better to remove the margin. You can do this by setting the “spacing”-property to 0.

image

jsFiddle: http://jsfiddle.net/HdFsr/1/

Code:

$("#chart").kendoChart({
    title: {
        text: "Kendo Chart Example"
    },
    series: [{
        name: "Example Series",
        data: [200, 450, 300, 125],
        spacing: 0},
    {
        name: "Another Series",
        data: [200, 450, 300, 125],
        }],
    categoryAxis: {
        categories: [2000, 2001, 2002, 2003]
    }
});​

Automatically adjust step to make charts readable for an unknown amount of datapoints

Step-property can be used to configure how many labels are rendered for the categoryAxis. Without setting “step” and if there’s too much data, the chart may get messy:

But it’s much more readable when step is set to 10:

But what happens when you set the step to 10 and your backend sends you only few datapoints? The chart respects the step-property and again the chart may look clumsy:

The solution is to adjust the step-property dynamically, based on the amount of data. For this you can use chart’s dataBound-event in combination with the DataSource-component:

function dataBound(e) {
    var chart = $("#chart").data("kendoChart");
    if (dataSource.view().length > 4) {
        chart.options.categoryAxis.labels.step = 10;
    }
    else {
        chart.options.categoryAxis.labels.step = 1;
    }    
}

jsFiddle: http://jsfiddle.net/wkGud/1/

Code:

var dataSource = new kendo.data.DataSource({
    data: [{
        "ReportDate": "2012-01-02T00:00:00",
        "Value": 500.000000},
    {
        "ReportDate": "2012-06-01T00:00:00",
        "Value": 350.000000},
    {
        "ReportDate": "2012-07-01T00:00:00",
        "Value": 100.000000},
    {
        "ReportDate": "2012-08-16T00:00:00",
        "Value": 150.000000},
    {
        "ReportDate": "2012-08-17T00:00:00",
        "Value": 250.000000}]
});

function dataBound(e) {
    var chart = $("#chart").data("kendoChart");
    if (dataSource.view().length > 4) {
        chart.options.categoryAxis.labels.step = 10;
    }
    else {
        chart.options.categoryAxis.labels.step = 1;
    }    
}

$("#chart").kendoChart({
    title: {
        text: "Employee Sales"
    },
    dataSource: dataSource,
    series: [{
        type: "line",
        field: "Value"}],
    categoryAxis: {
        field: "ReportDate",
        type: "Date",
        baseUnit: "days"
    },
    dataBound: dataBound

});

Customizing the series colors:

KendoUI provides different themes out of the box, but configuring just the colors used by the charts is easy with seriesColors-property.

For example the default theme uses red and green:

image

If we want to display the same chart with different shades of blue, we can set the seriesColors:

seriesColors: ["#b4dbeb", "#8cc7e0", "#174356", "#0c242e"],

image

jsFiddle: http://jsfiddle.net/BmQd9/1/

Code:

$("#chart").kendoChart({
    title: {
        text: "Kendo Chart Example"
    },
    seriesColors: ["#b4dbeb", "#8cc7e0", "#174356", "#0c242e"],
    series: [{
        name: "Example Series",
        data: [200, 450, 300, 125]},
    {
        name: "Another Series",
        data: [200, 450, 300, 125]
        }],
    categoryAxis: {
        categories: [2000, 2001, 2002, 2003]
    }
});​

Links:

KendoUI Dataviz Documentation

244 Comments

imageHere’s a new run of the ASP.NET Web Api vs Node.js benchmark but this time with few changes:

  • ASP.NET Web Api: The release candidate is used instead of beta.
  • ASP.NET Web Api: Self-Host is used instead of IIS.
  • ASP.NET Web Api: Use of async / await
  • Node.js: Version 0.6.19 is used instead of 0.6.17.

Also the test environment was tweaked a little and this time there was a dedicated c1.medium server for the ab.

The test

A simple server which accepts a POST-request and then responds back with the request’s body.

Node.js Implementation

var express = require('express') 
    , app = express.createServer(); 

app.use(express.bodyParser()); 

app.post('/', function(req, res){ 
    res.send(req.body); 
}); 

app.listen(8080);

ASP.NET Web Api implementation

public class ValuesAsyncController : ApiController 
{ 
    public async Task<string> Post() 
    { 
        return await this.ControllerContext.Request.Content.ReadAsStringAsync(); 
    } 
}

The benchmark

I used Apache’s ab tool to test the performance of the platforms. The benchmark was run with the following settings:

  • Total number of requests: 100 000
  • Concurrency: 80

The benchmark (test.dat) contained a simple JSON, taken from Wikipedia.

{
     "firstName": "John",
     "lastName" : "Smith",
     "age"      : 25,
     "address"  :
     {
         "streetAddress": "21 2nd Street",
         "city"         : "New York",
         "state"        : "NY",
         "postalCode"   : "10021"
     },
     "phoneNumber":
     [
         {
           "type"  : "home",
           "number": "212 555-1234"
         },
         {
           "type"  : "fax",
           "number": "646 555-4567"
         }
     ]
 }

Here’s the whole command which was used to run the performance test:

ab -n 100000 -c 80 -p .test.dat -T 'application/json; charset=utf-8' http://localhost/

The performance test was run 3 times and the best result for each platform was selected. The performance difference between the test runs was minimal.

The Test Environment

The benchmark was run on a Windows Server 2008 R2, hosted on an c1.medium Amazon EC2 –instance:

image

Specs of the instance
  • 1.7GB memory
  • 5 EC2 Compute Units (2 virtual cores)
Versions
  • Node.js: 0.6.19
  • ASP.NET Web Api: The release candidate.

The ab has its own dedicated c1.medium –instance. All the instances were on the eu-west-1a zone and the private IP was used to connect the ab and test servers.

The Benchmark Results

image

Web ApiNode.js
Time taken (in s)59,6454,73
Requests per second1676,761827,33
Time per request (in ms)47,7143,78
Failed requests00

Few words about the multi-core systems

Where Node.js is limited to a single thread and as such only uses one processor core, self-hosted Web Api can automatically take advantage of multi-core systems. With Node.js you have to use for example cluster in order to split the workload between the cores.

Here’s a graph from ASP.NET Web Api-server which shows the CPU usage of each logical processor (from my local machine):

image

Here’s an overall CPU usage when running the Node-server:

image

And here’s the same graph but this time with the ASP.NET Web Api-server:

image

The Code

The source code for the implementations and also the test tools (ab.exe, test.dat) are available from GitHub.

113 Comments

image

Much has been said about the Node.js’s great performance so I wanted to test out how it compares to an ASP.NET Web Api backend.I created a simple server for both of the platforms which accepts a POST-request and then responds back with the request’s body.

Update 24.6.2012: Updated tests with some tweaks.

The Node.js and ASP.NET Web Api implementations

Here’s the Node.js code:

var express = require('express')
    , app = express.createServer();

app.use(express.bodyParser());

app.post('/', function(req, res){
    res.send(req.body);
});

app.listen(3000);

And here’s the ASP.NET Web Api controller:

    public class ValuesController : ApiController
    {
        // POST /api/values
        public Task<string> Post()
        {
            return this.ControllerContext.Request.Content.ReadAsStringAsync();
        }
    }

Benchmark

I used Apache’s ab tool to test the performance of the platforms. The benchmark was run with the following settings:

  • Total number of requests: 100 000
  • Concurrency: 100

The benchmark (test.dat) contained a simple JSON, taken from Wikipedia.

{
     "firstName": "John",
     "lastName" : "Smith",
     "age"      : 25,
     "address"  :
     {
         "streetAddress": "21 2nd Street",
         "city"         : "New York",
         "state"        : "NY",
         "postalCode"   : "10021"
     },
     "phoneNumber":
     [
         {
           "type"  : "home",
           "number": "212 555-1234"
         },
         {
           "type"  : "fax",
           "number": "646 555-4567"
         }
     ]
 }

Here’s the whole command which was used to run the performance test:

ab -n 100000 -c 100 -p .test.dat -T 'application/json; charset=utf-8' http://localhost/

The performance test was run 3 times and the best result for each platform was selected. The performance difference between the test runs was minimal.

Test Environment

The benchmark was run on a Windows Server 2008 R2, hosted on an c1.medium Amazon EC2 –instance:

image

Specs of the instance

  • 1.7GB memory
  • 5 EC2 Compute Units (2 virtual cores)

Versions

  • Node.js: 0.6.17
  • ASP.NET Web Api: The official beta release.
  • IIS: 7

Both the Node and IIS –servers were run with their out-of-the-box settings.

Benchmark Results

image

 Web ApiNode.js
Time taken (in s)89.9541.65
Requests per second1111.692400.89
Time per request (in ms)89.9541.65
Failed requests00

Conclusion

The out-of-the-box performance of the Node.js seems to be better than the performance of the ASP.NET Web Api + IIS7. Tweaking the IIS7’s settings could make the ASP.NET Web Api perform better but for this test the default settings of IIS7 were used.