In this post we’re going to create a small Hello World application using the ASP.NET MVC 2 and NServiceBus. We’re going to use the forms authentication to pass the user credentials from the web client to the NServiceBus-based server. You can download the source code from the link in this post’s conclusion.
We’re going to use Visual Studio 2010 and .NET Framework 4.0 to create the sample.
1. Creating the solution
Let’s start by creating the solution. Start up your Visual Studio 2010 and create a new ASP.NET MVC 2 Web Application. By using the default template and not the empty web application template, we can use the built in AccountController for our client’s authentication. This class already implements the forms authentication for us. Please note though that using the default AccountController isnot advisable if you want to build an easily testable application.
You can hit F5 to make sure that your application is working at this point. We’re going to implement the connection from the client to the NServiceBus little later. Before that, we’re going to build our server.
2. The server
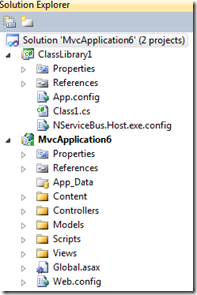
Now that we have our solution and ASP.NET MVC client set up, we’re going to implement the NServiceBus server. We’re not going to build that one from the scratch either. Instead we’re going to use the server which we built when we’re trying to get NServiceBus to play nicely with .NET Framework 4.0. Add that server project to your solution and make sure that everything compiles. At this point your solution should look like this:

You can right click on your ClassLibrary1 and select Debug – Start new instance to start your server. If you do that now, you can see that everything is logged to the console windows and it’s quite hard to figure out what’s going on. That’s why we’re going customize our logging. Remember, we’re going to build a full-blown Hello World application so it’s important we see our hellos on the screen.
Customizing the logging is easy.Open up your Class1.cs and make it implement the IWantCustomLogging-interface. Then, add the required Init-method and from there, make a call to SetLoggingLibrary’s Log4Net-method. The final product looks like this:
1: public class Class1 : IConfigureThisEndpoint, AsA_Server, IWantCustomLogging
2: { 3: public void Init()
4: { 5: SetLoggingLibrary.Log4Net(log4net.Config.XmlConfigurator.Configure);
6: }
7: }
Then open up the App.config and use it to configure the Log4net. First, add a new log4net-configsection. Then, add the log4net-configuration. Your complete configuration should look like the following snippet:
<?xml version="1.0" encoding="utf-8" ?>
<configuration>
<configSections>
<section name="MsmqTransportConfig" type="NServiceBus.Config.MsmqTransportConfig, NServiceBus.Core" />
<section name="UnicastBusConfig" type="NServiceBus.Config.UnicastBusConfig, NServiceBus.Core" />
<section name="log4net" type="log4net.Config.Log4NetConfigurationSectionHandler,log4net"/>
</configSections>
<MsmqTransportConfig
InputQueue="InputQueue"
ErrorQueue="error"
NumberOfWorkerThreads="1"
MaxRetries="5"
/>
<UnicastBusConfig
DistributorControlAddress=""
DistributorDataAddress="">
<MessageEndpointMappings>
</MessageEndpointMappings>
</UnicastBusConfig>
<log4net debug="false">
<appender name="console" type="log4net.Appender.ConsoleAppender">
<layout type="log4net.Layout.PatternLayout">
<param name="ConversionPattern" value="%d [%t] %-5p %c [%x] <%X{auth}> - %m%n"/> </layout>
</appender>
<root>
<level value="INFO"/>
<appender-ref ref="console"/>
</root>
</log4net>
</configuration>
Now, start the server from the context menu and instead of every debug message you should only see one information:
2010-08-09 18:12:34,780 [Worker.5] INFO NServiceBus.Unicast.UnicastBus [(null)]
<(null)> - InputQueue initialized.
The next thing we need to do is to create the hello world message and the handler for it.
3. The message and its handler
Start creating the message by adding a new class library project to the solution. In our tutorial we’re going to name it “Message”. Add a reference to NServiceBus.dll and rename the Class1 to HelloWorldMessage. Then all what is left is to decorate the class with IMessage-interface. The code looks like this:
1: namespace Message
2: { 3: public class HelloWorldMessage : IMessage
4: { 5: }
6: }
The message is ready so we’re going to build our message handler next. First, add a reference from your server-project to the Message-project. Then, add a class to the server-project and call it HelloWorldMessageHandler. Your new handler must implement the IHandleMessages<HelloWorldMessage> –interface.
Remember that we’re using the forms authentication in our client and this means that you can reach the authentication credentials of the message sender from the System.Threading.Thread.CurrentPrincipal. With this information, fill in the implementation for our handler:
1: public class HelloWorldMessageHandler : IHandleMessages<HelloWorldMessage>
2: { 3: public void Handle(HelloWorldMessage message)
4: { 5: Console.WriteLine("Hello world from the client!"); 6:
7: var principal = System.Threading.Thread.CurrentPrincipal;
8:
9: var userName = principal.Identity.Name;
10: Console.WriteLine("User: {0}", userName); 11: }
12: }
As you can see, the handler will print out the “Hello world” message and then the user’s name who sent the message to our bus.
Our server is now ready so you can start it from the context menu and let it run on the background (select Debug – Start new instance and then Debug – Detach all). Now all that is left is to connect our ASP.NET MVC 2 client to our server.
4. Connecting the client with out server
Because we’re using the ASP.NET MVC 2 template, we have most of the required functions already implemented. We’re going to modify the default web application by adding a new ActionLink to the Home-view. When a user clicks the link, a HelloWorld-message is sent to the server. Start by adding a reference to the following projects and dlls:
- Message-project which we created in our previous step
- NServiceBus.dll
- NServiceBus.Core.dll
- log4net.dll
Then open the Index-view (Views / Home) and remove everything from the MainContent-section and add the new actionlink:
<asp:Content ID="Content2" ContentPlaceHolderID="MainContent" runat="server">
<%: Html.ActionLink("Send hello", "SendHello", "Home")%></asp:Content>
Now, open the HomeController and add a new SendHello-method which returns an ActionResult. Before we can actually implement this method we have to acquire an instance to the NServiceBus. To do this, we’re going to edit the Application_Start-method in Global.asax.cs. Please note that our way isn’t the best way of doing this. In a real application you should use a IoC-container to inject the IBus to your controller-class.
Open the Global.asax.cs and add a static IBus member called Bus:
public static IBus Bus { get; private set; }Then initialize the Bus-member in the Application_Start-method. The complete method should look like the following:
1: protected void Application_Start()
2: { 3: AreaRegistration.RegisterAllAreas();
4:
5: RegisterRoutes(RouteTable.Routes);
6:
7: Bus = Configure.WithWeb()
8: .Log4Net()
9: .DefaultBuilder()
10: .XmlSerializer()
11: .MsmqTransport()
12: .IsTransactional(false)
13: .PurgeOnStartup(false)
14: .UnicastBus()
15: .ImpersonateSender(false)
16: .CreateBus()
17: .Start();
18: }
Because the Bus-member is public and static, we can now use it from our HomeController. Open up the HomeController again and finish the implementation of our SendHello-method. In the method, first create an instance of the HelloWorldMessage, then send it through the Bus and finally, return us back to the Home-view:
1: public ActionResult SendHello()
2: { 3: var message = new HelloWorldMessage();
4:
5: MvcApplication.Bus.Send(message);
6:
7: return View("Index"); 8: }
Only thing left is to update our client’s configuration with the knowledge of our NServiceBus server.
5. Modifying the web.config
Open the Web.config from your client-project and just after the <configuration> tag add the following four lines:
<configSections>
<section name="MsmqTransportConfig" type="NServiceBus.Config.MsmqTransportConfig, NServiceBus.Core"/>
<section name="UnicastBusConfig" type="NServiceBus.Config.UnicastBusConfig, NServiceBus.Core"/>
</configSections>
At that point you may see an error stating that the assembly NServiceBus.Core could not be resolved. You can fix this by building the project. Locate the </configuration> tag from your web.config and before that, add the NServiceBus configuration:
<MsmqTransportConfig InputQueue="MyWebClient" ErrorQueue="error" NumberOfWorkerThreads="1" MaxRetries="5"/>
<UnicastBusConfig>
<MessageEndpointMappings>
<add Messages="Message" Endpoint="InputQueue"/>
</MessageEndpointMappings>
</UnicastBusConfig>
Everything is now set up! Start up your web client (and make sure your server is still running) and you should see our modified home-page:

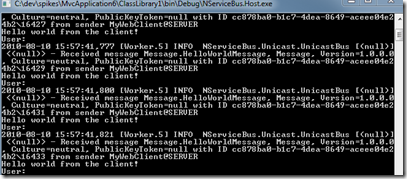
Click the Send hello –button few times and this is what you should see in your server’s console window:

The point of this tutorial was to pass the forms authentication information from your client to the server so let’s try that next. In your web site, click the Log on –link, then Register and fill in the details of your user. After registering, you’re already logged in and you should see our home-page. Click the Send hello and see how our server behaves.

Nice! If you take a step back and look at our NServiceBus-initialization in the Global.asx.cs, you can see that we set the ImpersonateSender to false. I’m not sure if this is by design or is it a bug, but we can remove the line, leave it to false or set it to true and in every case, the server can see the credentials of the user. This post from Udi Dahan seems to imply that is by design.
Usages
Now that we can see the user credentials on our NServiceBus message handler, we can implement a simple security system to our server. If you know that some messages can only be send by an authenticated user, you can throw away the messages which are missing the principal-information. You can do this in every message handler, manually. Or alternatively, you can create an AuthenticationMessageHandler which executes before your normal message handlers and throws away the messages from unauthorized sources (by calling the Bus.DoNotContinueDispatchingCurrentMessageToHandlers()-method). I’m hoping to post about this solution on a later date.
Conclusion
Getting the forms authentication information on a NServiceBus message handler is
as simple as reading the principal-information from the current thread. You can use that information when implementing a security system to your NServiceBus server.
Download the source code.


