0 Comments

I wasn’t aware that the Async CTP worked with Windows Phone 7 until I read this good introduction by Kevin Ashley.It’s not just the await and async –keywords which got me excited, it’s the thought of using TPL with WP7.

Unfortunately getting the CTP 3 to install wasn’t an easy task. First time everything seemed to go alright, except I couldn’t find the samples or DLLs from anywhere. Turns out this is a common problem and it is caused by the Silverlight 5 and some Visual Studio Hotfixes. 

Here are the steps I had to take in order to get the Async CTP installed:

  1. Removed Silverlight 5 SDK through Programs and Features
  2. Removed the following updates through Programs and Features / Installed Updates:
    1. KB2615527
    2. KB2635973
    3. KB2549864

All of these can be reinstalled after Async CTP has been installed.

After going through the steps described above, Async with WP7 is a go:

        private async void ButtonClick(object sender, RoutedEventArgs e)
        {
            Debug.WriteLine(await GetWebpage());
        }

        private async Task<string> GetWebpage()
        {
            return await new WebClient().DownloadStringTaskAsync(new Uri("http://www.bing.com"));
        }

Update: Thanks to lino to pointing out that also KB2645410 is known to cause issues.

3 Comments
Advert: IRC7 is the premium IRC-client for Windows Phone 7, supporting features like SSL, SASL, multiple server connections and scripting. Learn more at www.softwaremk.org/irc.

This is the part IV of a tutorial series which will describe the WP7’s sockets-support from a developer’s perspective. This tutorial series will focus on developing WP7 applications which require a long running TCP-connection that sends and receives text-based data. In these posts we will go through of building a complete IRC-client.

The focus of these posts is in the WP7’s developer’s perspective. If you want to better understand the inner details of the Internet sockets, Wikipedia has a good introduction on the subject.

This part of the series will focus on debugging sockets. In the next part we’re going to finish this tutorial series by adding SSL socket connections into our app.

Background

The basis of our client is ready. It can open a connection, receive a message and send a message. But it’s not very feature rich. When you start adding features, it’s likely that at some point you have to debug incoming or outgoing messages.

The basic way: Debug.WriteLine

The most basic way of debugging sockets is to use Debug.WriteLine to log every incoming and outgoing message before any processing is done on the message. When this kind of a debugging mechanism is added, we have a starting point for understanding what’s moving between the client and the server.

Debug.WriteLine will log the messages into the Visual Studio’s Output-window:

image

But this window doesn’t show everything. Let’s modify our debugging so that it also trims the received message and prints out the character count:

            Debug.WriteLine("Char count: {0} - Message: {1}", ircMessage.Length, ircMessage.Trim());

Now compare these two lines which we may receive from the server:

image

The messages look like identical, but the character count tells an another story. The reason for this is that the first message contains a special character which the Visual Studio’s output window can’t display. The situation changes when the lines are copy-pasted into the Notepad++:

image

Even though Notepad++ can’t render the message correctly, we can see what is different: There’s a special character just before the ‘0’. In case you wonder where this character origins from, it’s a color coded message sent using mIRC.

Debug.WriteLine allows you to get started rapidly but remember: Your output window may be hiding things from you.

Wireshark

In case Debug.WriteLine is too limited for your scenario, WireShark probably isn’t. WireShark allows you to “go deep”:

Wireshark is a free and open-source packet analyzer. It is used for network troubleshooting, analysis, software and communications protocol development, and education.

With WireShark we can capture every packet which is sent between our app and the server. When you download, install and run it, you’re first greeted with a dashboard, which lists all your network adapters:
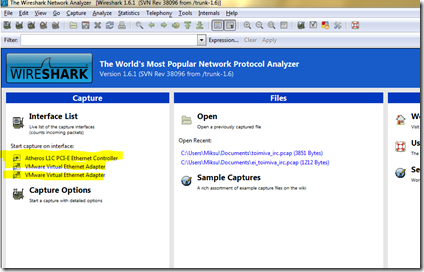
image

This computer has only one real network interface called “Atheros L1C PCI-E Ethernet Controller”. The situation differs between various computers but usually there should be only one, maybe two interfaces. When you select the correct one, WireShark automatically starts following the packages and showing this info to you, in real time.

image

WireShark is an excellent tool, but in our case it has one problem: It shows too much data. There’s just too many packets moving around and without filtering it it’s just not possible to find the related bits and pieces. But fortunately WireShark contains good tools for getting rid of the irrelevant data.

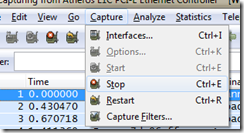
We want to monitor only the packages which are sent between our IRC-client and the server. So, let’s start by selecting Capture – Stop from the menu:
image

Then, let’s add a filter which removes everything except the packages which are from or to our IRC-server. In this case our server’s IP-address is 195.197.52.90. Here’s a filter which removes everything else:

ip.src eq 195.197.52.90 or ip.dst eq 195.197.52.90

This filter can be added to the top-left part of WireShark:

image

Now, start capturing the data by selecting Capture – Start. WireShark offers you the option to save the last capture as a file but we can continue without saving. Then, run your app and try to connect to the server. WireShark shows the packages moving between the client and the server and this time there isn’t that much data.

image

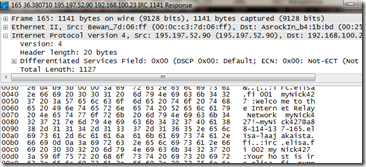
Try double clicking one of the lines with protocol “IRC” and you’ll see the exact message:
image

The listing is now quite good but still, we can make it even better. As you notice, there’s few items in the list with protocol TCP and if you look at the details of these messages, you’ll notice that they don’t contain any meaningful data for us. We can filter those out too:

(ip.src eq 195.197.52.90 or ip.dst eq 195.197.52.90) and irc

Now we have a filter which shows only the messages between our client and the server and in addition to that, it shows only the messages related to the IRC-protocol.

Conclusion

In this post we went through of couple different ways of debugging socket connections. Debug.WriteLine gets you started rapidly but remember, some character may not be visible. WireShark is the other option. It’s much more harder to use but also much more advanced.

Next up: Using SSL with Windows Phone sockets.

Source code

The whole source code for this tutorial is available from the GitHub.

Links

12 Comments

imageIn this Windows Phone 7 tutorial you will learn how to take advantage of Caliburn.Micro when displaying a list of non-identical objects to the user.

Background

Displaying a ListBox for a list which contains different kinds of items is a common scenario when developing applications for Windows Phone. For example your list can present a folder which contains files and subfolders. When presenting this list to the user you usually want the files and folders to look different. There’s many ways to make this happen, like ValueConverters and the following implementation using abstract DataTemplateSelector.

But if you’re using the Caliburn.Microframrwork, you’re all set. The functionalities inside the framework will take care of this automatically for you.

Scenario

You want to present a folder structure to the end user. You have one bindable list which contains both the subfolders and files and you have one ListBox inside the XAML which shows both types of items. The File.cs and Folder.cs files contain our models:

    public class File
    {
        public int Id { get; private set; }
        public string Name { get; private set; }
        public double Size { get; private set; }

        public File(int id, string name, double size)
        {
            Id = id;
            Name = name;
            Size = size;
        }
    }
    public class Folder
    {
        public int Id { get; private set; }
        public string Name { get; private set; }
        public List<Folder> SubFolders { get; private set; }

        public Folder(int id, string name, List<Folder> subFolders)
        {
            Id = id;
            Name = name;
            SubFolders = subFolders;
        }
    }

In the ListBox you want to display the item’s name and a little icon next to it to indicate the item’s type.

Implementation – The ViewModel

What we’re going to need is just one ViewModel. We’re not going to create ViewModels for our models:

  • MainPageViewModel – The main VM which contains the list which is shown to the user.

The MainPageViewModel inherit’s the Caliburn.Micro’s Conductor-class. The Conductor provides our VM an observable list where we can add items. When the list is modified, our view automatically gets a notification and knows to update itself.

You could manually create a new ObservableCollection , but in our case we try to take the full advantage out of our framework of choice.

The list can be accessed through the Items-property. So, to add a new item into our observable list, we can just call Items.Add(OurObject). As you’ll notice, we have defined the conductor as type of object. This mean that the Items-property inside the conductor is of type BindableCollection<object>. Meaning, you can actually add any type of items inside the collection. You can use more precise type if you know what kind of items your list contains.

The actual work the MainPageViewModel has to do is to create some fixed data for our application:

    public class MainPageViewModel : Conductor<object>.Collection.AllActive
    {
        protected override void OnInitialize()
        {
            Items.AddRange(new List<object>()
                               {
                                   new Folder(1, "Folder 1", null),
                                   new Folder(2, "Folder 2", null),
                                   new File(1, "File 1", 30.0),
                                   new File(2, "File 2", 30.0),
                                   new File(3, "File 3", 30.0),
                                   new Folder(4, "Folder 3", null),
                               });
        }
    }

We now have our ViewModel all set up so let’s concentrate on the Views next.

Implementation – The Views

We need three different Views:

  • MainPage.xaml – The page which contains our ListBox
  • FolderView – A UserControl which displays the Folder-item
  • FileViewModel – A UserControl which displays the File-item

Our MainPage.xaml is simple, containing only the ListBox. We’ll name it “Items”so that the Caliburn.Micro automatically binds it to our MainPageViewModel’s Items-property. What differs from the usual is our DataTemplate. We’re making the Caliburn.Micro to find the correct UserControl to represent our item.

            <ListBox x:Name="Items">
                <ListBox.ItemTemplate>
                    <DataTemplate>
                        <ContentControl cal:View.Model="{Binding .}" HorizontalAlignment="Left" />
                    </DataTemplate>
                </ListBox.ItemTemplate>
            </ListBox>

Now that our MainPage is all set we can create the UserControls which represent the items inside the folder. Here’s the implementation of FileView:


    <Grid x:Name="LayoutRoot" Background="Transparent" Margin="12 0 0 0">
        <Grid.ColumnDefinitions>
            <ColumnDefinition Width="auto"></ColumnDefinition>
            <ColumnDefinition></ColumnDefinition>
        </Grid.ColumnDefinitions>
        <Image Grid.Column="0" Source="/Icons/appbar.save.rest.png"/>
        <TextBlock Grid.Column="1" Text="{Binding Name}" VerticalAlignment="Center" Style="{StaticResource PhoneTextNormalStyle}"/>
    </Grid>

And the FolderView looks similar, we’ll just change the Image. But notice, you could customize these views anyway you want, for example displaying the folder’s subfolders inline.

    <Grid x:Name="LayoutRoot" Background="Transparent">
        <Grid.ColumnDefinitions>
            <ColumnDefinition Width="auto"></ColumnDefinition>
            <ColumnDefinition></ColumnDefinition>
        </Grid.ColumnDefinitions>
        <Image Grid.Column="0" Source="/Icons/appbar.folder.rest.png"/>
        <TextBlock Grid.Column="1" Text="{Binding Name}" VerticalAlignment="Center" Style="{StaticResource PhoneTextTitle3Style}"/>
    </Grid>

imageIf we now run the application we will see that everything is almost set, except that the Caliburn.Micro can’t find the correct views for the File and Folder-classes. Let’s take care of that next.

Matching the ViewModel and Models to Views

As you remember, we didn’t create ViewModel-classes for the models. Instead we’ll tell Caliburn.Micro how to match the File and Folder –models to their views.

Caliburn.Micro uses conventions to match Views and ViewModels. The most common convention for finding a View for a ViewModel is to just drop the Model from the type name, for example CustomerViewModel –> CustomerView. The framework is highly configurable and you can add your own conventions. 

In order for the framework to find our views, we’ll add couple rules to its ViewLocator. We configure the ViewLocator inside the application’s bootstrapper. We could have named our models FileViewModel and FolderViewModel and if we had done so, we wouldn’t need the following because the Caliburn.Micro could automatically find the views:

            ViewLocator.NameTransformer.AddRule("caliburn_micro_datatemplate_selector.File", "caliburn_micro_datatemplate_selector.FileView");
            ViewLocator.NameTransformer.AddRule("caliburn_micro_datatemplate_selector.Folder", "caliburn_micro_datatemplate_selector.FolderView");

The code explains itself quite well. We just pass in the ViewModel-type’s full name and the matching View’s full name. To make the code refactoring easier we could use types instead of the magic strings:

            ViewLocator.NameTransformer.AddRule(typeof(File).FullName, typeof(FileView).FullName);
            ViewLocator.NameTransformer.AddRule(typeof (Folder).FullName, typeof (FolderView).FullName);

And that’s it. We now have an application which can handle the situation where one list contains multiple types of objects.

image

Conclusion

Caliburn.Micro offers a powerful solution for those situations where your list contains multiple types of objects and you want to display them in a single ListBox.

Full source code for the sample app is available from the GitHub.

Links

0 Comments

We recently upgraded one of our Windows Phone 7 apps to Mango and things went quite smoothly using the Visual Studio’s built-in “Upgrade to Windows Phone 7.1” –functionality.

image

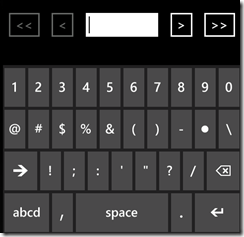
But when we started testing the app, we noticed that some of our textboxes had a wrong input scope. In one case this made our app impossible to use with virtual keyboard because the textbox was missing the Enter-key.

We had previously defined the textbox using the InputScope “Number”:

<TextBox InputScope="Number"/>

And with out pre-Mango version this was the output:

image

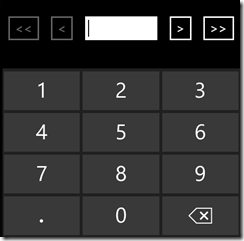
But, after upgrading the app to Mango, the keyboard was completely different:

image

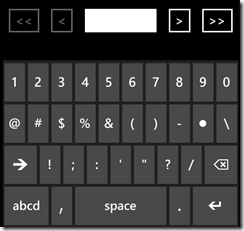
The Enter-key was gone, rendering the app useless. We had to change the InputScope to “PostalCode” to get the required functionality back:

image

So, even if the Mango-upgrade goes smoothly, it’s a good idea to test all the textboxes before submitting your app.

Links

4 Comments

I’ve recently started using the Telerik’s RadControls for Windows Phone. Here’s a convention for Caliburn.Micro which allows the easier usage of RadTransitionControl:

            ConventionManager.AddElementConvention<RadTransitionControl>(ContentControl.ContentProperty, "DataContext", "Loaded").GetBindableProperty =
        delegate(DependencyObject foundControl)
        {
            var element = (ContentControl)foundControl;

            var useViewModel = element.ContentTemplate == null;

            if (useViewModel)
            {
                return View.ModelProperty;
            }

            return ContentControl.ContentProperty;
        };

With this convention you can use the RadTransitionControl similar to ContentControl but with the difference that RadTransitionControl will show an effect (like fading) when the content changes. Here’s an example where the convention is used by Caliburn.Micro to automatically bind a control named Target to the ViewModel’s property:

XAML:

<telerikPrimitives:RadTransitionControl x:Name="Target" />

View model:

        public NewTargetBaseViewModel Target
        {
            get { return target; }
            set
            {
                target = value;
                NotifyOfPropertyChange(() => Target);
            }
        }