8 Comments

Here’s a base class for Windows Phone apps which I’ve been using to store user settings. It wraps the IsolatedStorageSettings and it’s a slightly modified version of the SettingsStore-class included in the “A Case Study for Building Advanced Windows Phone Applications – Code Samples”. Here’s an example of how to use the base class (in a Windows Phone 8 app):

    public class MySettingsStore : SettingsStore
    {
        public bool IsFirstAppStart
        {
            get { return this.GetValueOrDefault(true); }
            set { this.AddOrUpdateValue(value); }
        }

        public string FirstName
        {
            get { return this.GetValueOrDefault(""); }
            set { this.AddOrUpdateValue(value); }
        }
    }

The class can be used store more complex objects too, as long as they are serializable:

    [DataContract]
    public class User
    {
        [DataMember]
        public string Name { get; set; }
    }

    public class MySettingsStore : SettingsStore
    {
        public List<User> Users
        {
            get { return this.GetValueOrDefault(new List<User>()); }
            set { this.AddOrUpdateValue(value); }
        }
    }

The GetValueOrDefault-method takes one parameter and this is the default value which is returned if no stored setting is found.

In your app you can store a setting using the following code:

var settingsStore = new MySettingsStore();
...
settingsStore.FirstName = this.FirstNameTextBox.Text;

And to read a setting (or the default value):

var settingsStore = new MySettingsStore();
...
this.FirstNameTextBox.Text = settingsStore.FirstName;

Here’s the full code for the base class SettingsStore. It uses the CallerMemberNameto automatically deduct the key for a setting.

using System;
using System.Collections.Generic;
using System.IO.IsolatedStorage;
using System.Runtime.CompilerServices;

namespace Adafy.Infra
{
    public class SettingsStore
    {
        private readonly IsolatedStorageSettings isolatedStore;

        public SettingsStore()
        {
            this.isolatedStore = IsolatedStorageSettings.ApplicationSettings;
        }

        protected void AddOrUpdateValue(object value, [CallerMemberName]string key = "key")
        {
            var valueChanged = false;

            lock (this)
            {

                try
                {
                    if (value == null)
                    {
                        // Nothing to remove
                        if (!this.isolatedStore.Contains(key))
                            return;

                        this.isolatedStore.Remove(key);
                        this.Save();
                    }

                    // If the new value is different, set the new value.
                    if (this.isolatedStore[key] != value)
                    {
                        this.isolatedStore[key] = value;
                        valueChanged = true;
                    }
                }
                catch (KeyNotFoundException)
                {
                    this.isolatedStore.Add(key, value);
                    valueChanged = true;
                }
                catch (ArgumentException)
                {
                    this.isolatedStore.Add(key, value);
                    valueChanged = true;
                }

                if (valueChanged)
                {
                    this.Save();
                }
            }
        }

        protected T GetValueOrDefault<T>(T defaultValue, [CallerMemberName]string key = "key")
        {
            lock (this)
            {

                T value;

                try
                {
                    value = (T)this.isolatedStore[key];
                }
                catch (KeyNotFoundException)
                {
                    value = defaultValue;
                }
                catch (ArgumentException)
                {
                    value = defaultValue;
                }

                return value;
            }

        }

        private void Save()
        {
            try
            {
                this.isolatedStore.Save();
            }
            catch (Exception)
            {
                return;
            }
        }
    }

}

SettingsStore for Windows Phone 7

CallerMemberName isn’t available in Windows Phone 7. Because of this, each settings must provide an unique key:

    public class MySettingsStore : SettingsStore
    {
        private const string FirstAppStartKey = "MyKey";
        private const string FirstNameKey = "MyKey2";

        public bool IsFirstAppStart
        {
            get { return this.GetValueOrDefault(true, FirstAppStartKey); }
            set { this.AddOrUpdateValue(value, FirstAppStartKey); }
        }

        public string FirstName
        {
            get { return this.GetValueOrDefault("", FirstNameKey); }
            set { this.AddOrUpdateValue(value, FirstNameKey); }
        }
    }

Here’s the full code for WP7 version of the SettingsStore, which is nearly identical to the one provided in Prism.

using System;
using System.Collections.Generic;
using System.IO.IsolatedStorage;
using System.Runtime.CompilerServices;

namespace Adafy.Infra
{
    public class SettingsStore
    {
        private readonly IsolatedStorageSettings isolatedStore;

        public SettingsStore()
        {
            this.isolatedStore = IsolatedStorageSettings.ApplicationSettings;
        }

        protected void AddOrUpdateValue(object value, [CallerMemberName]string key = "key")
        {
            var valueChanged = false;

            lock (this)
            {

                try
                {
                    if (value == null)
                    {
                        // Nothing to remove
                        if (!this.isolatedStore.Contains(key))
                            return;

                        this.isolatedStore.Remove(key);
                        this.Save();
                    }

                    // If the new value is different, set the new value.
                    if (this.isolatedStore[key] != value)
                    {
                        this.isolatedStore[key] = value;
                        valueChanged = true;
                    }
                }
                catch (KeyNotFoundException)
                {
                    this.isolatedStore.Add(key, value);
                    valueChanged = true;
                }
                catch (ArgumentException)
                {
                    this.isolatedStore.Add(key, value);
                    valueChanged = true;
                }

                if (valueChanged)
                {
                    this.Save();
                }
            }
        }

        protected T GetValueOrDefault<T>(T defaultValue, [CallerMemberName]string key = "key")
        {
            lock (this)
            {

                T value;

                try
                {
                    value = (T)this.isolatedStore[key];
                }
                catch (KeyNotFoundException)
                {
                    value = defaultValue;
                }
                catch (ArgumentException)
                {
                    value = defaultValue;
                }

                return value;
            }

        }

        private void Save()
        {
            try
            {
                this.isolatedStore.Save();
            }
            catch (Exception)
            {
                return;
            }
        }
    }
}

The SettingsStore classes could be combined with the help of conditional compilation.
9 Comments
  •   Posted in: 
  • UWP

If you’re building a custom user control to be used on multiple pages, it may come handy if the control’s functionalities can be easily changed. For example imagine a search grid with a textbox, button and the result list. If you want to use the same control on multiple pages, it may be required that the datasource of the control can be easily configured. One way to handle a scenario like this is to allow the developer customize the behavior on the View Model’s side by using bind to a method. Let’s go through some code:

The user control

image

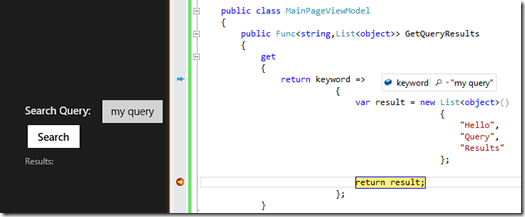
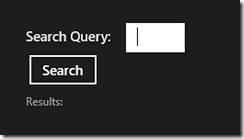
The idea is to build a user control which can be dropped on to multiple different pages. When the user clicks “Search”, the query is executed on the view model and the result is returned to the user control.

For this we need a Dependency Property of type System.Func. The func takes a string (the search query) and returns a list of objects. This is executed when the user clicks Search. The complete code with the dependency property included is shown below:

    public sealed partial class MyUserControl
    {
        public static readonly DependencyProperty GetQueryResultsCommandProperty =
            DependencyProperty.Register("GetQueryResultsCommand", typeof (Func<string,List<object>>), typeof (MyUserControl), new PropertyMetadata(default(Func<string,List<object>>)));

        public Func<string,List<object>> GetQueryResultsCommand
        {
            get { return (Func<string,List<object>>) GetValue(GetQueryResultsCommandProperty); }
            set { SetValue(GetQueryResultsCommandProperty, value); }
        }

        public MyUserControl()
        {
            this.InitializeComponent();
        }

        private void SearchButtonClick(object sender, RoutedEventArgs e)
        {
            var results = GetQueryResultsCommand.Invoke(this.Keyword.Text);

            ShowResults(results);
        }

        private void ShowResults(List<object> results)
        {
            //
        }
    }

The page

Next thing on the list is a page which contains the user control.

    <Grid Background="{StaticResource ApplicationPageBackgroundThemeBrush}">

        <local:MyUserControl HorizontalAlignment="Center" VerticalAlignment="Center"
                             GetQueryResultsCommand="{Binding GetQueryResults}"/>

    </Grid>

The GetQueryResultsCommand is bound against the view model’s method.

The view model

Last step is to implement the GetQueryResults-method on the view model. The method is implemented as a read-only property of Func<string,List<object>> so it uses the same signature as the dependency property. This can be read as a “method which takes a string as a parameter and returns a list of objects”.

    public class MainPageViewModel
    {
        public Func<string,List<object>> GetQueryResults
        {
            get
            {
                return keyword =>
                           {
                               var result = new List<object>()
                                                {
                                                    "Hello",
                                                    "Query",
                                                    "Results"
                                                };

                               return result;
                           };
            }
        }
    }

And that’s it. When the user clicks the search button, the event handler invokes the method which we have defined on the view model, using bind to method.

image

17 Comments

It's hard to schedule tasks on Azure: The platform doesn't have built-in support for executing custom code based on a schedule. There's some options to get around this though, for example:

  • Azure VM and the Windows Task Scheduler
  • Azure Service Bus and ScheduledEnqueueTimeUTC

But these have some limitations which may be hard to get around: In the case of a VM, if it goes down, everything stops. With Azure Service Bus you need some service which handles the scheduling.

This is where the Quartz.net fits in. Quartz.net is a flexible and easy-to-use library for running scheduled tasks. And it works great on Azure.

Here's some highlights of Quartz.net's features:

  • Supports clusters
  • Can use SQL Azure
  • Cron-style syntax for scheduling tasks

In this tutorial we build a Quartz.net (version 2.0.1) cluster using SQL Azure and ASP.NET.

The database

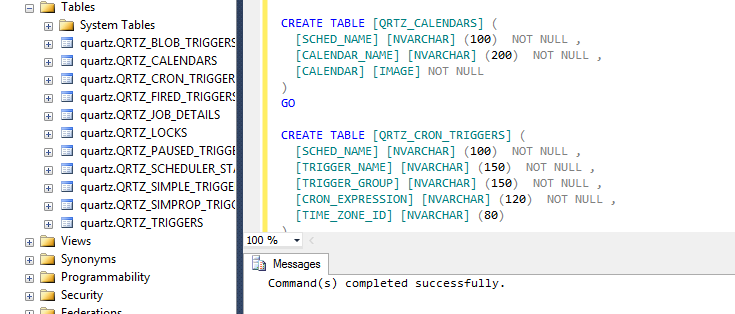
First we need to set-up the SQL Azure database. Quartz.net will persist all the job details and triggers to this database. Easiest way to create the required tables is to use Management Studio to log in to the database and to execute the Quartz.net database schema creation script.

And that's it for the database. Next step is to build the service for running the Quartz.net.

The ASP.NET project

The SQL Azure store is ready and now we need a service which will run actions based on the triggers. The service can be almost anything: a console app, a Windows Service or an ASP.NET project. In this tutorial we're going to use an ASP.NET project which is deployed to two extra small Cloud Service instances.

Here are the steps required for creating the service:

  1. Create new project with template "ASP.NET Empty Web Application"
  2. Use NuGet to install package "Quartz"
  3. Add New Item to project using template "Global Application Class" (global.asax)

Modify the Global.asax.cs so that the Quartz.net starts and stop with the application:

using System;
using Common.Logging;
using Quartz;
using Quartz.Impl;

namespace QuarzApp
{
    public class Global : System.Web.HttpApplication
    {
        public static IScheduler Scheduler;

        protected void Application_Start(object sender, EventArgs e)
        {
            ISchedulerFactory sf = new StdSchedulerFactory();
            Scheduler = sf.GetScheduler();

            Scheduler.Start();
        }

        protected void Application_End(object sender, EventArgs e)
        {
            Scheduler.Shutdown();
        }
    }

}

And finally modify the Web.config to include the Quartz.net configuration:

<?xml version="1.0"?>
<configuration>

  <configSections>
    <section name="quartz" type="System.Configuration.NameValueSectionHandler, System, Version=1.0.5000.0,Culture=neutral, PublicKeyToken=b77a5c561934e089" />
    <sectionGroup name="common">
      <section name="logging" type="Common.Logging.ConfigurationSectionHandler, Common.Logging"/>
    </sectionGroup>
  </configSections>

  <system.web>
    <compilation debug="true" targetFramework="4.5" />
    <httpRuntime targetFramework="4.5" />
  </system.web>

  <common>
    <logging>
      <factoryAdapter type="Common.Logging.Simple.TraceLoggerFactoryAdapter, Common.Logging">
        <arg key="showLogName" value="true"/>
        <arg key="showDataTime" value="true"/>
        <arg key="level" value="INFO"/>
        <arg key="dateTimeFormat" value="HH:mm:ss:fff"/>
      </factoryAdapter>
    </logging>
  </common>

  <quartz>
    <add key="quartz.scheduler.instanceName" value="MyScheduler" />
    <add key="quartz.scheduler.instanceId" value="AUTO" />

    <add key="quartz.threadPool.type" value="Quartz.Simpl.SimpleThreadPool, Quartz" />
    <add key="quartz.threadPool.threadCount" value="5" />
    <add key="quartz.threadPool.threadPriority" value="Normal" />

    <add key="quartz.jobStore.useProperties" value="true" />
    <add key="quartz.jobStore.clustered" value="true" />
    <add key="quartz.jobStore.misfireThreshold" value="60000" />
    <add key="quartz.jobStore.type" value="Quartz.Impl.AdoJobStore.JobStoreTX, Quartz" />
    <add key="quartz.jobStore.tablePrefix" value="QRTZ_" />

    <add key="quartz.jobStore.driverDelegateType" value="Quartz.Impl.AdoJobStore.SqlServerDelegate, Quartz" />

    <add key="quartz.jobStore.dataSource" value="myDS" />

    <add key="quartz.dataSource.myDS.connectionString" value="Server=tcp:myserver.database.windows.net,1433;Database=mydatabase;User ID=myuser@myserver;Password=mypassword;Trusted_Connection=False;Encrypt=True;Connection Timeout=30;" />
    <add key="quartz.dataSource.myDS.provider" value="SqlServer-20" />
  </quartz>

</configuration>

That's it. The service for running the scheduled jobs is ready. As the last step we're going to create a simple job and a schedule for it.

Example job

All the bits and pieces are ready and only thing left is to test out the service. For that we need a job to execute and a trigger which will handle the execution.

The Quartz.net jobs implement a simple IJob interface. The following job will log a message when it is executed:

    public class MyJob : IJob
    {
        private static ILog logging = LogManager.GetLogger(typeof (MyJob));

        public void Execute(IJobExecutionContext context)
        {
            var mydata = context.MergedJobDataMap["data"];

            logging.InfoFormat("Hello from job {0}", mydata);
        }
    }

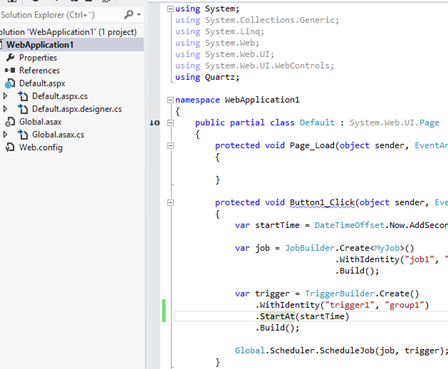
To execute a job we need a trigger for it. Here's an example code which will add a single trigger for the job, making it to execute after 15 seconds has passed. Create a Web Form "Default.aspx" to the project, add a button to it and in its click handler create a new trigger and add it to the scheduler:

        protected void Button1_Click(object sender, EventArgs e)
        {
            var startTime = DateTimeOffset.Now.AddSeconds(15);

            var job = JobBuilder.Create<MyJob>()
                                .WithIdentity("job1", "group1")
                                .Build();

            var trigger = TriggerBuilder.Create()
                .WithIdentity("trigger1", "group1")
                .StartAt(startTime)
                .Build();

            Global.Scheduler.ScheduleJob(job, trigger);
        }

Deployment and application pools

As the service uses ASP.NET, it can be deployed to Azure Web Sites or to Azure Cloud Services. One thing to keep in mind is that the IIS will recycle the application pools automatically. This will shut down the application and the Quartz.net with it. To get around this limitation, it may be wise to change the application pool's recycling interval to 0.

Another option is to create Quarz.net job which "pings" the current web site once in every 10 minutes or to use some other keep-alive service for the pinging.

Links

5 Comments


Windows Azure supports Wordpress out of the box. But what is little-known are the limitations of this solution:

  • The maximum size of the Wordpress database is 20MB.
  • The MySQL database is provided by ClearDB, not Microsoft. In order to raise the limit, one must purchase a plan (starting from $9.99/mo) through ClearDB.

Fortunately, it’s possible to skip the MySQL altogether and to run Wordpress with SQL Azure.

Tools

Officially Wordpress supports only MySQL. But it has a rich set of different plugins and one of those plugins is WP Db Abstraction. The plugin makes it possible to run the site using a different database platform, in this case SQL Azure. On the Microsoft forums a forum member mouradl provided instructions on how to install and use the plugin. I took those instructions and built a GitHub repository which make the process of deploying a Wordpress with SQL Azure a little easier.

The repository contains the following versions:

  • Wordpress 3.4.2
  • WP Db Abstraction 1.1.4

The following tutorial shows how to run the Wordpress using SQL Azure and Azure Web Sites.

Tutorial

Setting up a Wordpress with SQL Azure requires only few steps:

  1. Creation of a SQL Azure database
  2. Creation of an empty Azure Web Site
  3. Deployment of the Wordpress using Git
  4. The configuration

1. Creating the SQL Azure database

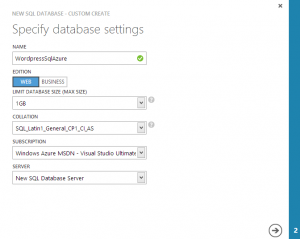
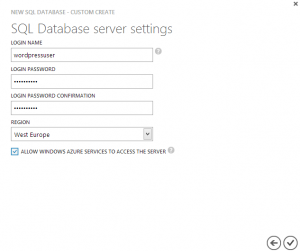
We start by creating an empty SQL Azure database using the Azure management portal. In this tutorial we use the following configuration:

  • Name: WordpressSqlAzure
  • Max size: 1GB
  • Collation: SQL_Latin1_General_CP1_CI_AS
  • Login name: wordpressuser
  • Login password: Password32
  • Region: West Europe
  • Allow Windows Azure Services To Access The Server: Yes


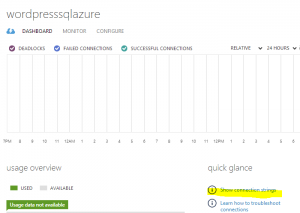
It usually takes less than a minute before the SQL Azure database is ready. Open the database details and make note of the connection string:

  • Server: co4h26putx.database.windows.net

2. Creating the empty Azure Web Site

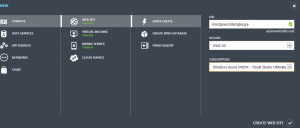
Next thing required is an empty Azure Web Site. It’s best to create it to the same region as the database is created. In this tutorial the following definitions are used:

  • URL: WordpressSiteSqlAzure
  • Region: West Europe

At this point we have the empty Web site and the empty database ready.

3. The deployment of a Wordpress site

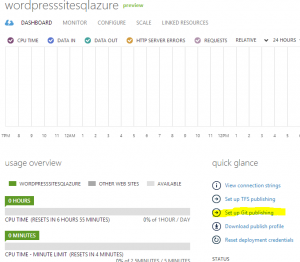
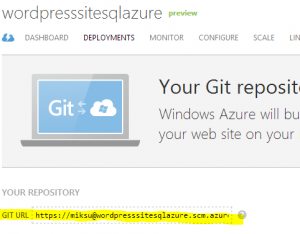
Next step is to add the Wordpress site into our web server. First, using the Azure Management Portal, enable the Git publishing for our newly created site. The required function is “Set up Git publishing”.

Take note of the web site’s Git URL:

The next part is little tricky as we have to first clone the Wordpress-SQL-Azure repository from GitHub and then deploy it to the Azure.

Clone the repository from GitHub:

git clone https://github.com/mikoskinen/wordpress-sql-azure.git

Add the Azure web site’s Git URL to the cloned repository:

git remote add azure https://miksu@wordpresssitesqlazure.scm.azurewebsites.net/WordpressSiteSqlAzure.git

Push the files to Azure Web Site:

git push azure master

Now we have the required files on Azure. Only thing left is to configure our Wordpress installation to work with the SQL Azure database.

4. The configuration

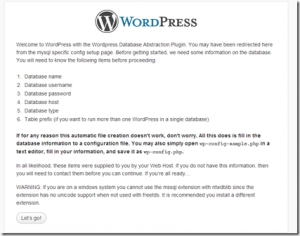
To configure the Wordpress to work with SQL Azure, we must navigate to WP Db Abstraction plugins configuration page. The URL is http://url.azurewebsites.net/wp-content/mu-plugins/wp-db-abstraction/setup-config.php, so in this tutorial: http://wordpresssitesqlazure.azurewebsites.net/wp-content/mu-plugins/wp-db-abstraction/setup-config.php

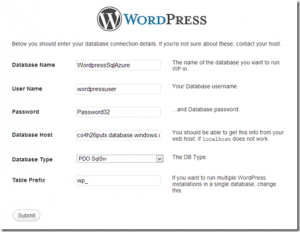
From the welcome page select “Let’s go” to set the configuration. On this step we must set the details of our SQL Azure database:

  • Database Name: WordpressSqlAzure
  • User Name: wordpressuser
  • Password: Password32
  • Database Host: co4h26putx.database.windows.net
  • Database Type: PDO SqlSrv
  • Table Prefix: wp_

Make sure to select PDO SqlSrv as database type, not “SQL Server using MS PHP Driver”:

The configuration wizard makes sure that the connection works and gives the notification that everything is set up from the SQL Azure ‘s point of view:

Now everything is ready and the install wizard will automatically continue from the Wordpress’ default installation. Give the site a name, enter a password and email and you’re all set!

Note about the plugins

Most of the Wordpress plugins should work with SQL Azure but there are some which override the db.phpfile from wp-content –folder. This happens for example with the W3 Total Cache plugin. The easiest solution is to avoid these plugins (for example WP Super Cache works without modifications) but if the db.php gets replaces by some plugin, the fix is to use a FTP Client and to upload the db.php from wordpress-sql-azure repository to the site’s wp-content –folder.

11 Comments

image

The WebBrowser control in Windows Phone 8 has one serious problem: It sometimes forgets to render the HTML. This happens with the NavigateToString-method, Navigate-method works fine. Unfortunately though this problems also affects the Windows Phone 7 apps deployed to Windows Phone 8 phones.

After the repro, the bottom part of this post shows one hack which gets around this problem.

Repro

Here’s a simple repro of the problem. The program can display the HTML page either by navigating to the URL or by downloading the content to string and using the NavigateToString. The same app has been deployed to both the Windows Phone 7 and Windows Phone 8 emulators (this problem is visible also on the real devices).

The code:

public partial class MainPage 
{ 
    private const string url = "http://assets.softwaremk.org/temp/NotWorking.html"; 

    public MainPage() 
    { 
        InitializeComponent(); 
    }

    private async void NavigateStringClick(object sender, RoutedEventArgs e) 
    { 
        var client = new WebClient(); 
        var content = await client.DownloadStringTaskAsync(url);

        WebBrowser.NavigateToString(content); 
    }

    private void NavigateUrlClick(object sender, RoutedEventArgs e) 
    { 
        WebBrowser.Navigate(new Uri(url)); 
    } 
}

The HTML:

<!DOCTYPE html PUBLIC "-//W3C//DTD XHTML 1.0 Transitional//EN" 
"http://www.w3.org/TR/xhtml1/DTD/xhtml1-transitional.dtd">
<html>
<head>
    <meta http-equiv="Content-Type" content="text/html; charset=utf-8" />
    <meta http-equiv="X-UA-Compatible" content="IE=edge,chrome=1" />
</head>
<body>
    Some content
</body>
</html>

Test results

Windows Phone 7 & Navigate

OK

image

Windows Phone 7 & NavigateToString

OK

image

Windows Phone 8 & Navigate

OK

image

Windows Phone 8 & NavigateToString

BROKEN

image

Observations

The problem seems to be related to the HTML meta tags. The test HTML has two meta tags and if either of them is removed, the page is displayed correctly.

Solution

Here’s a solution which gets around this problem. It’s not beautiful by any means but it seems to do the trick.

  1. Download the HTML content as string
  2. Store it to the IsolatedStorage
  3. Use WebControl to navigate to the isolated storage
var client = new WebClient(); 
var content = await client.DownloadStringTaskAsync(url);

var store = IsolatedStorageFile.GetUserStoreForApplication();

using (var writeFile = new StreamWriter(new IsolatedStorageFileStream("htmlcontent.html", FileMode.Create, FileAccess.Write, store))) 
{ 
    writeFile.Write(content); 
    writeFile.Close(); 
}

var uri = new Uri("htmlcontent.html", UriKind.Relative);

WebBrowser.Navigate(uri);

Result:

image