3 Comments
Advert: IRC7 is the premium IRC-client for Windows Phone 7, supporting features like SSL, SASL, multiple server connections and scripting. Learn more at www.softwaremk.org/irc.

This is the part IV of a tutorial series which will describe the WP7’s sockets-support from a developer’s perspective. This tutorial series will focus on developing WP7 applications which require a long running TCP-connection that sends and receives text-based data. In these posts we will go through of building a complete IRC-client.

The focus of these posts is in the WP7’s developer’s perspective. If you want to better understand the inner details of the Internet sockets, Wikipedia has a good introduction on the subject.

This part of the series will focus on debugging sockets. In the next part we’re going to finish this tutorial series by adding SSL socket connections into our app.

Background

The basis of our client is ready. It can open a connection, receive a message and send a message. But it’s not very feature rich. When you start adding features, it’s likely that at some point you have to debug incoming or outgoing messages.

The basic way: Debug.WriteLine

The most basic way of debugging sockets is to use Debug.WriteLine to log every incoming and outgoing message before any processing is done on the message. When this kind of a debugging mechanism is added, we have a starting point for understanding what’s moving between the client and the server.

Debug.WriteLine will log the messages into the Visual Studio’s Output-window:

image

But this window doesn’t show everything. Let’s modify our debugging so that it also trims the received message and prints out the character count:

            Debug.WriteLine("Char count: {0} - Message: {1}", ircMessage.Length, ircMessage.Trim());

Now compare these two lines which we may receive from the server:

image

The messages look like identical, but the character count tells an another story. The reason for this is that the first message contains a special character which the Visual Studio’s output window can’t display. The situation changes when the lines are copy-pasted into the Notepad++:

image

Even though Notepad++ can’t render the message correctly, we can see what is different: There’s a special character just before the ‘0’. In case you wonder where this character origins from, it’s a color coded message sent using mIRC.

Debug.WriteLine allows you to get started rapidly but remember: Your output window may be hiding things from you.

Wireshark

In case Debug.WriteLine is too limited for your scenario, WireShark probably isn’t. WireShark allows you to “go deep”:

Wireshark is a free and open-source packet analyzer. It is used for network troubleshooting, analysis, software and communications protocol development, and education.

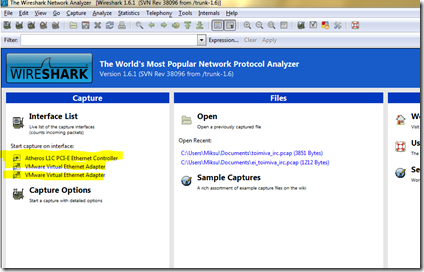
With WireShark we can capture every packet which is sent between our app and the server. When you download, install and run it, you’re first greeted with a dashboard, which lists all your network adapters:

image

This computer has only one real network interface called “Atheros L1C PCI-E Ethernet Controller”. The situation differs between various computers but usually there should be only one, maybe two interfaces. When you select the correct one, WireShark automatically starts following the packages and showing this info to you, in real time.

image

WireShark is an excellent tool, but in our case it has one problem: It shows too much data. There’s just too many packets moving around and without filtering it it’s just not possible to find the related bits and pieces. But fortunately WireShark contains good tools for getting rid of the irrelevant data.

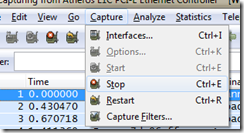
We want to monitor only the packages which are sent between our IRC-client and the server. So, let’s start by selecting Capture – Stop from the menu:

image

Then, let’s add a filter which removes everything except the packages which are from or to our IRC-server. In this case our server’s IP-address is 195.197.52.90. Here’s a filter which removes everything else:

ip.src eq 195.197.52.90 or ip.dst eq 195.197.52.90

This filter can be added to the top-left part of WireShark:

image

Now, start capturing the data by selecting Capture – Start. WireShark offers you the option to save the last capture as a file but we can continue without saving. Then, run your app and try to connect to the server. WireShark shows the packages moving between the client and the server and this time there isn’t that much data.

image

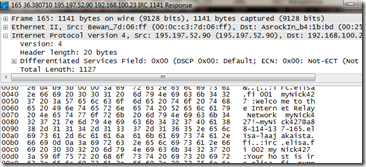
Try double clicking one of the lines with protocol “IRC” and you’ll see the exact message:

image

The listing is now quite good but still, we can make it even better. As you notice, there’s few items in the list with protocol TCP and if you look at the details of these messages, you’ll notice that they don’t contain any meaningful data for us. We can filter those out too:

(ip.src eq 195.197.52.90 or ip.dst eq 195.197.52.90) and irc

Now we have a filter which shows only the messages between our client and the server and in addition to that, it shows only the messages related to the IRC-protocol.

Conclusion

In this post we went through of couple different ways of debugging socket connections. Debug.WriteLine gets you started rapidly but remember, some character may not be visible. WireShark is the other option. It’s much more harder to use but also much more advanced.

Next up: Using SSL with Windows Phone sockets.

Source code

The whole source code for this tutorial is available from the GitHub.

Links

3 Comments

In this tutorial we will go through of couple different ways of using custom constructor parameters when resolving an instance with Unity:

  1. By using the built-in ParameterOverride
  2. By creating a custom ResolverOverride.

Background

When you’re using a DI-container like Unity, you normally don’t have to worry about how the container resolves the new instance. You have configured the container and the container will act based on your configuration. But there may be cases where you have pass in custom constructor parameters for the resolve operation. Some may argue that this screams of bad architecture but there’s situations like bringing a DI-container to a legacy system which may require these kind of actions.

Resolved class

In this tutorial we are resolving the following test class:

    public class MyClass
    {
        public string Hello { get; set; }
        public int Number { get; set; }

        public MyClass(string hello, int number)
        {
            Hello = hello;
            Number = number;
        }
    }

It is registered to the container using RegisterType-method and without passing in any parameters:

            var unity = new UnityContainer();
            unity.RegisterType<MyClass>();

So let’s see how we can pass in the “hello” and “number” variables for the MyClass’ constructor when calling Unity’s Resolve.

Unity ResolverOverride

Unity allows us to pass in a “ResolverOverride” when the container’s Resolve-method is called. ResolverOverride is an abstract base class and Unity comes with few of these built-in. One of them is ParameterOverride which “lets you override a named parameter passed to a constructor.” 

So knowing that we need to pass in a string named “hello” and an integer called “number”, we can resolve the instance with the help of ParameterOverride:

        [Test]
        public void Test()
        {
            var unity = new UnityContainer();
            unity.RegisterType<MyClass>();

            var myObj = unity.Resolve<MyClass>(new ResolverOverride[]
                                           {
                                               new ParameterOverride("hello", "hi there"), new ParameterOverride("number", 21)
                                           });

            Assert.That(myObj.Hello, Is.EqualTo("hi there"));
            Assert.That(myObj.Number, Is.EqualTo(21));
        }

We pass in two instances of ParameterOverride. Both of these take in the name and the value of the parameter.

Custom ResolverOverride: OrderedParametersOverride

But what if you don’t like passing in the parameter names and instead you want to pass in just the parameter values, in correct order? In order to achieve this we can create a custom ResolverOverride. Here’s one way to do it:

    public class OrderedParametersOverride : ResolverOverride
    {
        private readonly Queue<InjectionParameterValue> parameterValues;

        public OrderedParametersOverride(IEnumerable<object> parameterValues)
        {
            this.parameterValues = new Queue<InjectionParameterValue>();
            foreach (var parameterValue in parameterValues)
            {
                this.parameterValues.Enqueue(InjectionParameterValue.ToParameter(parameterValue));
            }
        }

        public override IDependencyResolverPolicy GetResolver(IBuilderContext context, Type dependencyType)
        {
            if (parameterValues.Count < 1)
                return null;

            var value = this.parameterValues.Dequeue();
            return value.GetResolverPolicy(dependencyType);
        }
    }

The parameter values are passed  in through the constructor and put into a queue. When the container is resolving an instance, the parameters are used in the order which they were given to the OrderedParametersOverride.

Here’s a sample usage of the new OrderedParametersOverride:

        [Test]
        public void TestOrderedParametersOverride()
        {
            var unity = new UnityContainer();
            unity.RegisterType<MyClass>();

            var myObj = unity.Resolve<MyClass>(new OrderedParametersOverride(new object[] {"greetings", 24 }));

            Assert.That(myObj.Hello, Is.EqualTo("greetings"));
            Assert.That(myObj.Number, Is.EqualTo(24));
        }

Sample code

The above examples can be found from GitHub.

9 Comments

screenshot_smallGrazeWP7 is a Windows Phone 7 app marketing site generator. It uses the Graze templating engine with Twitter Bootstrap to create static web sites.

GrazeWP7 uses a simple configuration file to generate a static web site for your application. The generated sited is pure HTML / CSS / JavaScript and can be hosted on any web server.

More details

More details about WP7Graze, including the quick start, are available from the project’s home.

Inspiration

The GrazeWP7 was inspired from the following projects:

It uses Windows Phone image assets from those projects.

369 Comments

Grazeis a simple static site generator. It takes a template and a configuration file and generates a static web site. The generated sited is pure HTML / CSS / JavaScript and can be hosted on any web server. The Graze templates are created using the Razor Syntax.

Getting started

  1. Download and extract the Graze. It comes with an example.
  2. Run graze.exe.

The static site (index.html) is generated into the “output” folder.

Graze templates

The Graze templates are created using the Razor.

<html>
<head>
    <title>@Model.Title</title>
</head>
<body>
    <h1>@Model.Description</h1>
</body>
</html>

Graze configuration

The configuration for Graze is done in XML.

<?xml version="1.0" encoding="utf-8" ?>
<site>
  <Title>Graze</Title>
  <Description>Graze: Static site generator using Razor</Description>
</site>

The configuration file represents the data which is injected to the generated static site.

Generating the static site

Once the Graze template and the configuration file are in place, the static site can be generated running the graze.exe. The static site is outputted to the output-folder.

Examples

The GrazeWP7 uses Graze to generate marketing sites for Windows Phone 7 applications.

screenshot_small

Features

Lists

Lists can be created in XML and accessed in the Graze template. Example XML:

  <Features>
    <Feature>Layouts defined using Razor syntax.</Feature>
    <Feature>Dynamic data models created in XML.</Feature>
    <Feature>Supports complex data models and arrays.</Feature>
    <Feature>Fast static site generation.</Feature>
    <Feature>Pure HTML / CSS / Javascript output. Host in Apache, IIS etc.</Feature>
  </Features>

Example template for accessing the list:

    <h2>Features:</h2>
    <ul>
        @foreach (var feature in Model.Features)
        {
            <li>@feature</li>
        }
    </ul>

Complex types

By default all the data in the XML is of type string when accessed from the template. But complex types can be created also:

<Link Url="https://github.com/mikoskinen/graze">Source code hosted in GitHub</Link>
<a href="@Model.Link.Url">@Model.Link.Link</a>

Case sensitive

The configuration is case sensitive.

Folder structure

Graze expects the following folder structure:

graze.exe
--template/
----configuration.xml
----index.cshtml
----assets

The assets folder is copied wholly to the output folder. The assets folder can include the CSS / JSS / image files required by the template.

License

Graze is available with the MIT-license. It uses the RazorEngine to generate the output.

Source code

Graze is hosted at GitHub.