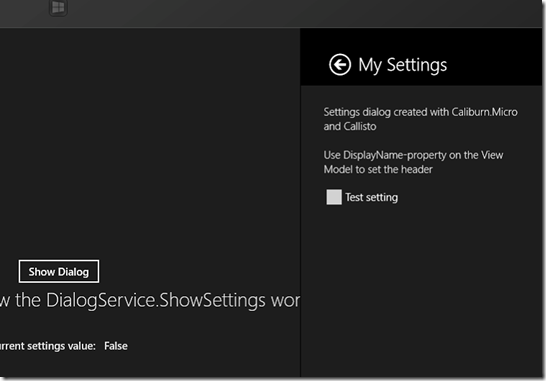
Callisto Dialog Helpers for Caliburn.Micro WinRT
Callisto is excellent open source UI Control library for the Windows 8 Store apps. Caliburn.Micro is a powerful framework for building Windows Phone, Silverlight and Windows 8 Store apps. These helpers make it easier to combine Caliburn.Micro with the Callisto's dialogs (Flyouts).
Content
- Helper for displaying settings dialogs on the Settings charm
- Helper for displaying normal dialogs all around the screen
Install
The helpers are available as a source code through NuGet:
Install-Package CaliburnMicroWinRTCallistoHelpers
Installing the package will add a Dialogs-folder into your project. This folder contains the source code for the helpers.
Requirements
Your project must reference Callisto and the Caliburn.Micro must be set right. The helpers have been tested with Callisto 1.2.1.
To learn how to set up Caliburn.Micro for WinRT, you may refer to this tutorial.
Sample
A sample app showing the usage of the helpers is available from the GitHub repository.
Usage
- Create normal Caliburn.Micro view model (inheriting from Screen / Conductor) and the view for the view model
- Pass the type of the view model to the helper. The helper will create the view model and the view and it will display the dialog.
Normal dialog
Use DialogService.ShowDialog<TViewModel>() to display a dialog.
Parameters
- PlacementMode (Required): The way the Callisto dialog works is that you provide it an UI control as a placement target. The dialog will open next to this UI control. PlacementMode defines if the dialog should be shown above, under, left or right of this UI control.
- PlacementTarget (Required): The placement target.
- onInitialize: Action which is executed before the dialog is shown.
- onClose: Action which is executed after the dialog has been closed.
Example
Page's XAML:
<Button x:Name="ShowDialog" Content="Show Dialog" HorizontalAlignment="Center"/>
Page's View Model:
public void ShowDialog(FrameworkElement source)
    {
        DialogService.ShowDialog<DialogViewModel>(PlacementMode.Left, source);
    }
Dialog's view model:
public class DialogViewModel : Screen
        {
            public async void ShowMessage()
            {
                var dlg = new MessageDialog("Hello from Dialog");

                await dlg.ShowAsync();
            }
        }
Dialog's View:
<UserControl
        x:Class="caliburn_micro_winrt_getting_started.DialogView"
        ...
        Height="200"
        Width="200">

        <Grid >
            <TextBlock Text="Callisto Dialog" Foreground="Black" Style="{StaticResource SubheaderTextStyle}"/>
            <Button x:Name="ShowMessage" Content="Show Message" Foreground="Black" HorizontalAlignment="Center" VerticalAlignment="Center"/>
        </Grid>
    </UserControl>
Settings dialog
The settings dialog can be shown similar to a normal dialog:
DialogService.ShowSettings<SettingsViewModel>()
Here’s an example which shows how to initialize the view model before it’s shown (the initialization happen before the view model’s OnInitialize is called). It also shows how to to update the UI after the settings dialog has closed:
DialogService.ShowSettings<SettingsViewModel>(onInitialize: vm => vm.TestSetting = this.CurrentValue, onClosed: (vm, view) => CurrentValue = vm.TestSetting);
Adding the view model to settings pane
On the MainPage of your application, use the AddSetting-extension method:
private static bool initialized;
        public MainPage()
        {
            this.InitializeComponent();

            if (initialized) return;

            SettingsPane.GetForCurrentView().CommandsRequested += CommandsRequested;
            initialized = true;
        }

        private void CommandsRequested(SettingsPane sender, SettingsPaneCommandsRequestedEventArgs args)
        {
            args.AddSetting<SettingsViewModel>();
        }
Parameters
- onInitialize: Action which is executed before the settings dialog is shown.
- onClosed: Action which is execute after the dialog has been closed.
- headerBrush: Can be used to control the color of the settings header
- backgroundBrush: Can be used to control the background color of the settings page
Dialog's title is automatically determined from the ViewModel's DisplayName-property.
Example
View Model:
public sealed class SettingsViewModel : Screen
    {
        public SettingsViewModel()
        {
            this.DisplayName = "My Settings";
        }

        public bool TestSetting { get; set; }
    }
View:
<UserControl
        x:Class="caliburn_micro_winrt_getting_started.SettingsView"
        ...
        >

        <StackPanel>
            <CheckBox Content="Test setting" x:Name="TestSetting" Margin="0 20 0 0" />
        </StackPanel>
    </UserControl>
Source code and sample
The source code for these helpers and the sample app are available from GitHub.
